Castelfranco radicchio
February 22, 2013 § Leave a comment
Since discovering the Natoora range of unusual vegetables and salads now supplied by Ocado I’ve become obsessed by trying every kind of radicchio on offer. Radicchio originates from the Veneto region of Italy and many of the varieties are named after local towns.
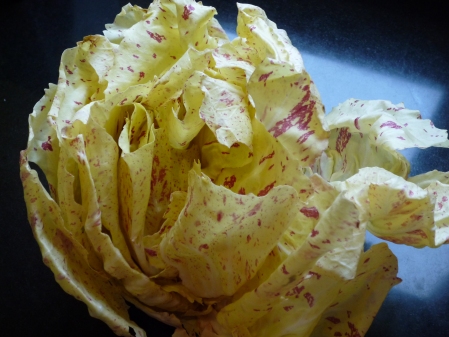
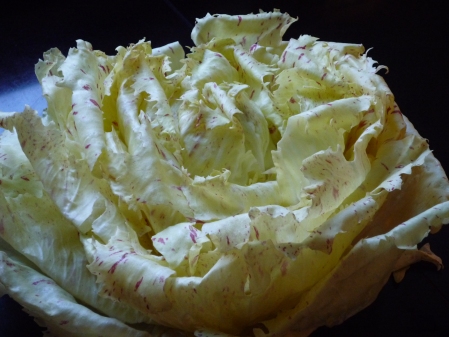
First up is the gorgeous Castelfranco radicchio with its cream and deep-red variegated leaves:
It’s as pretty as an old-fashioned rose and you just have to admire it before adding it to your salad bowl:
The delicately bitter leaves of Castelfranco are best suited to salads which brighten up the winter table. The leaves are not as delicate as they look either in flavour or texture so partner well with robust ingredients such as bacon, citrus fruits and nuts.
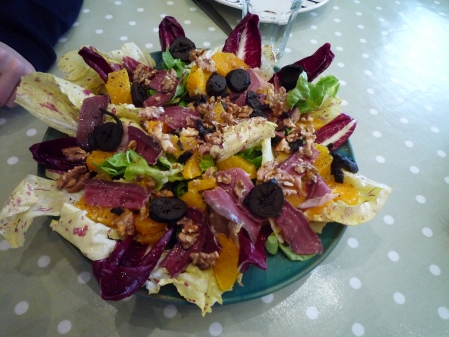
Here’s one of my recent slightly over-the-top lunchtime creations:
Here are the recipes for two simpler salad recipes, the first from Italy’s legendary “Il Cucchaio d’Argento” cookbook, and the second inspired by a Skye Gyngell recipe published in 2011 in her Independent column. Finally, another “Il Cucchaio d’Argento” recipe, this time for ricotta and walnut stuffed Castelfranco leaves which are briefly blanched in boiling water before being used to encase the filling.
Recipe for Castelfranco radicchio and pancetta salad
Adapted from a recipe in Il Cucchaio d’Argento. Serves 4.
Ingredients
250g Castelfranco radicchio
200g cubed pancetta
Maldon salt and freshly ground black pepper
A few spritzes of white balsamic vinegar (optional)
Lightly toasted small slices of baguette/ciabatta/country bread to serve
Detach the leaves from the radicchio head and wash and dry them carefully. Arrange them attractively on a large salad plate.
Place the cubed pancetta in a frying pan and heat gently to render the fat. Once the fat is rendered increase the heat and cook until the pancetta is lightly browned.
Pour the pancetta and its rendered fat over the Castelfranco leaves, crumble over a flew flakes of Maldon salt and a few twists of black pepper and quickly toss the salad to distribute the pancetta and its fat evenly. If likes, spritz the leaves lightly with white balsamic vinegar (you can buy it in plastic bottles fitted with an atomiser top).
Serve with lightly toasted small slices of toasted bread alongside.
Recipe for Castelfranco radicchio, orange and hazelnut salad
Adapted from Skye Gyngell’s recipe published in the Independent on Sunday in January 2011. As the author says, it makes a refreshing winter salad, perfect as a light first course.
Serves 4
Ingredients
1 small to medium head Castelfranco radicchio
handful shelled blanched hazelnuts
2 oranges, preferably blood oranges
1 teaspoon Dijon mustard
1 tablespoon red wine vinegar
3-4 tablespoons hazelnut oil
Maldon salt and freshly ground black pepper
Remove the leaves of the radicchio from the head, wash, dry carefully and tear into large pieces. Arrange in a salad bowl or on a serving platter.
Lightly toast the hazelnuts in a dry frying pan being careful not to let the toast too much. Chop roughly and sprinkle over the salad leaves.
Cut the peel and pith off the oranges using a very sharp and/or serrated small knife. Slice the naked oranges into pinwheel shapes and arrange these over the salad.
Finally make the dressing by whisking together in a small bowl the mustard, red wine vinegar, 3 tablespoons hazelnut oil and a little salt and pepper. Taste and add more oil,salt and pepper if required to balance out the flavours. Spoon the dressing over the salad using just as much as required as the salad should not be overdressed.
Recipe for Castelfranco radicchio rolls stuffed with ricotta and walnut
Adapted from a recipe in Il Cucchaio d’Argento. Serves 4.
Ingredients
10 large handsome Castelfranco radicchio leaves
100g ricotta
2 tablepoons freshly grated parmesan cheese
20 walnut halves (I like Serr walnuts from Chile available from Sainsbury’s)
1 egg yolk
salt and pepper
butter for the baking dish
Preheat the oven to 180 degrees C.
Blanch the radicchio leaves a few at a time in a large pan of boiling salted water for 1 minute. Remove and set out to dry carefully on clean teatowels.
Roughly chop the walnuts and put them into a bowl along with the ricotta, a little freshly grated parmesan, salt, pepper and egg yolk. Mix thoroughly.
Put a tenth of the ricotta mixture onto each blanched radicchio leaf and roll to form a neat rolled bundle. Place each stuffed roll into a generously buttered baking dish, arranging neatly side by side.
Bake for 15 minutes and serve straight from the baking dish.
Comforting casseroles part 3: veal
December 15, 2012 § Leave a comment
The weather pre-Christmas is cold and wintry and thoughts turn to warming casseroles once again. I’ve previously shared my favourite pork (part 1) and beef (part 2) casserole recipes and now it’s veal’s turn. Don’t worry this isn’t pale Dutch veal reared in less than humane conditions, but the more robust English pink veal reared to high welfare standards, a tasty by-product of the UK dairy industry that frankly would be a waste NOT to eat.
Today’s dish is classic Milanese dish of braised veal shin on the bone, Osso Buco, served up with its traditional partner, saffron scented risotto milanese, one of the few instances in Italian cooking when risotto is served as an accompaniment rather than as a separate primo piatto course.
I’ve read about this dish many times over the years but have never been able to try it as a) I had no inkling where I’d get hold of decent veal which hasn’t until recently been widely available in the UK and b) even if I could track down veal I didn’t think I’d find a butcher able to prepare the necessary shin slices complete with intact marrow bone, one of the highlights of the finished dish.
I was delighted to find that Ocado recently began offering slices of veal shin for osso buco alongside its other veal offerings (which include fantastic veal chops, veal rib joints and proper escalopes). They come two or occasionally three to a pack and a pack weighs a tad over 500g so you need two packs for the recipe below which serves four.
You begin by tying your veal into dinky packages with string. This serves to keep the star marrowbone intact during the long braising. You may need to tie around the piece of veal shin as well to keep it in a nice round piece. My pieces of veal looked perfectly well formed and butchered so I omitted this step and just did the package tied up with string thing:
Once the trussed veal pieces have been coated in seasoned flour, the only other bit of prep required is to finely dice a small onion and stick of celery. Don’t worry if you’re iffy about celery – after 2 hours cooking the vegetables break down to produce a textured sauce and there’s no pronounced celery flavour, just a deep savouriness.
The next step is to brown the floured veal slices in hot oil. The veal is then removed and set aside whilst the vegetables are sweated in some butter which you add to the pan. Then the vermouth or white wine is added and reduced a little before adding the stock and returning the meat to the pan for a long slow 2 hour braise.
A word about choice of stock. In a quest for meaty perfection I bought some rather expensive chilled beef stock from the supermarket and used this topped up with some stock from a “quality” reduced salt beef stock cube. I did the same thing with my accompanying risotto milanese. The end result, odd as it may sound was just too beefy and intense. The veal marrowbones and collagen-rich shin meat make a most wonderful sauce as the meat braises so I think there is really no need to start with a rich meaty stock. Next time I make this dish I’ll use a light stock made from a good quality reduced salt cube, making it up at a weaker strength than recommended on the packet. The meat and bones will do the rest for me.
This is how the veal looks before the long slow braise:
And here it is once the cooking is complete, freshened up with its sprinkling of gremolada, a lively mix of chopped flatleaf parsley, grated lemon zest and a smidge of finely chopped garlic:
Serve the meat with risotto alla milanese and a green vegetable. We chose roast courgette, as Anna del Conte does in the glorious photo accompanying the recipe in her book “Gastronomy of Italy”. I’ve largely drawn on this recipe in my version which I give below. The recipe is an authentic Milanese one and thus, unlike many published versions of the recipe, contains no tomato.
The risotto alla milanese recipe I give below is also adapted from Anna del Conte’s and is made in the usual way. If you’re familiar with making risotto you’ll have no trouble following it. If you haven’t made risotto before I’d suggest buying a good Italian cookbook and reading up in detail on risotto-making technique before attempting to follow my slightly sketchy instructions!
One last word – be sure to scoop out the unctuous marrow from the centre of the ossi buci and mash it into your risotto – delicious.
Recipe for ossibuci alla milanese
Adapted from Anna del Conte’s recipe in “Gastronomy of Italy”.
Serves 4
Ingredients
4 decent sized ossibuci (slices of veal shin on the bone) each weighing about 250g)
seasoned flour
3 tablespoons light olive oil
25g butter
1 small onion, finely diced
1 small stick of celery, finely diced
175 ml white vermouth (I like Noilly Prat) or white wine
300 ml light stock (beef, chicken, vegetable – a qood quality stock cube is OK) or even water
For the gremolada
1 teaspoon grated lemon zest
1 very finely chopped small garlic clove
2 tablespoons chopped flatleaf parsley
Tie each osso buco with string as if you were wrapping a package. This is to retain the marrowbone in place during the long cooking and turning process. If, after looking at your pieces of veal, you think it advisable to tie a piece of string around the circumference of each slice to keep it all together then do this as well.
Coat the veal slices lightly in seasoned flour. I put about 6 tablespoons of flour into a deep bowl, then mix in a teaspoon of fine salt before dipping the veal pieces in the flour. Discard the excess flour afterwards.
Heat the 2 tablespoons of light olive oil over a medium heat in a heavy lidded shallow casserole that is big enough to hold the veal snugly in a single layer. Once the oil is hot, put the veal pieces into the pan and leave untouched for 4 or 5 minutes to brown. Turn the veal over using a pair of tongs and brown the other side. Once the browning is complete, turn the heat to low, remove the veal and set aside in a shallow dish.
Once the pan has cooled a litle, add the butter and once melted, add the diced onions and celery and fry gently without browning until soft and translucent, about 8 to 10 minutes’s cooking. Now add the vermouth or wine to the pan and let bubble for a minute or two to reduce a little. Now add the stock and return the veal slices plus any juices which have accumulated in the dish back to the pan. Turn up the heat to bring the contents to the boil then reduce the heat to a bare simmer, cover with the lid and leave to simmer for one and half to two hours until the meat is tender.
Turn the meat over delicately with tongs about every twenty minutes during the 2 hour cooking period to ensure an even braise and tender meat.
While the meat is cooking, prepare the gremolada by combining the chopped parsley, finely chopped garlic and grated lemon zest in a small bowl. Mix well, cover and set aside.
Once you judge that the meat is cooked, check the consistency of the sauce. If it is a little too thin, remove the lid and raise the heat a little and gently boil away some of the liquid until you have a chunky coating sauce consistency. Check the seasoning too. Because the stock you have used is likely to contain salt (especially if you’re using a stock cube) I’ve not specified any additional salt in the recipe other than a little salt in the seasoned flour.
Snip of the string from the meat, scatter over the gremolada and serve with risotto milanese and a green vegetable – roast courgette (still available as I write in December) or steamed broccoli would both work well.
Recipe for Risotto alla Milanese
Adapted from Anna del Conte’s recipe in “Gastronomy of Italy”.
Serves 4
Ingredients
900ml light chicken or beef stock (homemade or good quality stock cube)
1 small onion or medium shallot finely diced
40g unsalted butter
350g risotto rice (Carnaroli or Arborio)
90ml white vermouth (I like Noilly Prat)
big pinch saffron strands
sea salt and freshly ground black pepper
additional 20g unsalted butter
25g freshly grated parmesan
You need two medium heavy-based saucepans for this recipe. Bring the stock to simmering point in the first saucepan and melt 40g butter in the second. Add the chopped onion or shallot to the pan containing the butter and sauté gently until soft and translucent.
Add the rice to the butter and onions and stir over a low heat until the rice is thoroughly coated with the butter. Turn up the heat to medium and add the vermouth and boil for a minute or so, stirring all the time. Now add the hot stock a ladleful at a time, stirring until the rice has absorbed the stock before adding the next ladleful. Once two or three ladles of stock have been added, crumble the saffron strands into the risotto. It should be kept simmering, not too slowly and not too fast either and should be cooked in 15-20 minutes. Test the rice after it has cooked for 15 minutes by biting on a grain. When ready it should be cooked through to the al dente stage and and should no longer have a hard chalky centre but should not be soft and mushy. If it’s not ready, add a little more stock (or boiling water if you’ve used it all) and cook for a minute or so longer before testing again. Conversely, you may not need to add all the stock from the pan.
When the risotto is ready, remove from the heat, stir in seasoning and add the additional 20g butter and 25g grated parmesan, cover the pan and leave for a minute or two for all the elements to merge in a savoury manner.


