
A summery salad from Southwold
May 24, 2015 § Leave a comment
Whilst on our annual pilgrimage to Southwold on the bracing Suffolk coast I tried out a new salad recipe inspired by the cover recipe on this month’s Delicious magazine. It combines two of the season’s best ingredients – asparagus and baby new potatoes and adds to them crunchy radishes and a fresh herby dressing. The Delicious magazine recipe requires you to whip up a herb hollandaise sauce to dress the salad but creating a vinegar reduction, separating eggs and creating a delicate emulsion is not my idea of fun for a quick holiday lunch, and frankly, the idea of all that butter is a little off-putting. I replaced the herb hollandaise with a quick and easy yoghurt and herb dressing that worked really well with the other ingredients.
At this time of year, Southwold’s greengrocer, the Crab Apple in the Market Place is heaving with local Seabreeze asparagus, so much so that one no longer feels the need to treat it reverentially. Wild fennel grows in abundance by the beach and a little of this thrown into the herb dressing adds a fresh aniseed flavour note that works well with the asparagus and potatoes.
The genius part of this salad is that the potatoes are not just plain boiled but after a quick parboil are smashed and roasted in olive oil in a hot oven becoming deliciously crispy.
In terms of aesthetics, the long thin white tipped Breakfast variety of radish look prettiest, especially if you leave on a little of the green radish top. If you can’t get hold of these then the regular scarlet globe-shaped type works just fine.
Here’s the recipe. I’d recommend it to anyone wanting to pep up a holiday lunch and it provides welcome relief from yet another carb-heavy pork pie and sandwich picnic.

Southwold asparagus and crispy potato salad
Serves 4
Adapted from a recipe in the Delicious magazine May 2015 edition.
Ingredients
450-500g baby new potatoes (e.g. Jersey Royals), scrubbed
4-5 tablespoons olive oil
400g asparagus, woody parts trimmed-off and ends peeled
200g radishes, washed, trimmed and halved lengthwise (the long thin white-tipped Breakfast variety look prettiest but the regular
For the dressing
250g full fat natural yoghurt
sea salt and freshly ground black pepper
small clove of garlic, peeled, smashed and finely chopped
generous handful of fresh herbs – whatever you can get hold of – I used fennel foraged from the beach, basil and chives
Optional garnish
a spoonful of extra chopped herbs
a little balsamic vinegar or pomegranate molasses
Heat the oven to 200 degrees C fan. Line a shallow roasting tin with baking paper
Cook the potatoes in boiling salted water for 7-8 minutes until you can just pierce them with a knife point but they are not quite tender. Drain thoroughly and tip the potatoes onto the prepared roasting tin. Press each potato with a fork to squash it partially. Drizzle over the olive oil, season and toss lightly to coat. Slip the roasting tin into the oven and roast the potatoes for about 30 minutes, turning them half way through the cooking time.
While the potatoes are in the oven, make the dressing. Put all the dressing ingredients into a medium bowl, stir to mix, cover and set aside in the fridge.
Steam or boil the prepared asparagus until just tender – about 5 minutes for the plump spears shown in the photograph. Slice each asparagus spear into two halves carefully on the diagonal.
When the potatoes are ready, tip them onto a platter and spread them out. Scatter over the asparagus and then the radishes. Dollop the herbed yoghurt dressing over the salad and, if liked, scatter over a few chopped herbs and drizzle with just a little balsamic vinegar or pomegranate molasses.
Bat cakes for a Night at the Opera
September 1, 2013 § Leave a comment
The opera in question was Die Fledermaus (The Bat), Clonter Opera Cheshire’s summer production. We’ve been going to Clonter for a number of years now and theming the dessert course of our opera picnic seems to have become my speciality.
Die Fledermaus is a light-hearted operetta composed by Johann Strauss the younger in 1874. It’s location is Vienna and the plot revolves around a ball set-piece scene, lots of disguises (including the bat costume) and all the silliness ends happily with forgiveness and reconciliation.
The combination of the bat image combined with the Viennese setting led me to the idea of a chocolate-bat decorated individual Sachertorte, Vienna’s iconic cake, as the centrepiece of my dessert. The Hotel Sacher has updated its chocolate cake offering by selling indvidual ganache-enrobed cubes of chocolate cake each topped with a chocolate seal. I loved the idea of these and thought they would look great topped with a discreet dark chocolate bat rather than the corporate Sacher logo.
Where on earth would I find bat-shaped confectionery in summer? There were various Halloween-themed bits and pieces available online but nothing the right size. Then I thought of Slattery’s, North Manchester’s own chocolatier. A quick phone call to John Slattery himself and two dozen bats were lined up ready for collection in two days’ time. I was even offered a choice of sizes. What service!
A single piece of chocolate cake was not going to be a show-stopper on its own so I decided that the Sachertorte would be one component within a dessert Bento-style box.
Our local cake shop supplied me (for a price!) with 12 cupcake boxes, one per guest, in a clean white card and cellophane window design that were perfect for my requirements. Sturdy enough for stacking and transport and flat-pack disposable for an easy clean-up at the end of the evening.
Now with box dimensions to work with I could visualise more easily what else I needed to complete the box. Vienna is famous for its cakes, in particular luscious layered tortes. After researching classic Viennese cakes I chose to construct a miniaturised version of the Esterházy Torte, a multilayered construction sandwiching nut sponge layers with a vanilla and nut flavoured cream, topped with a traditional feather-iced pattern.
That was two corners of the box taken care of. Now for the other two. I needed something to offset the sweet and dense cakes. A simple fruit compôte would be perfect and I chose apricot as both the Sacher and Esterházy Tortes use lots of sieved apricot jam in their construction so the flavours should be harmonious. Also, the best reason of all, apricots were in season and in peak condition.
Next I needed cream to set off both the tortes and the compôte. Sachertorte is traditionally served with a cloud of whipped cream but I like to combine Greek yoghurt and softly whipped cream 50:50, flavour it with real vanilla extract and lightly sweeten with icing sugar for a lighter, fresher result.
The apricot compôte and whipped cream could be served in transparent deli-style sealed cartons stacked one on top of each other. That left the final corner of the box to fill. What could I do here? I thought of chocolate-dipped Viennese fingers or sandwiched Viennese whirls, but these seemed to owe more to Mr Kipling than any true Viennese heritage. I then frantically thought of mini Kugelhopfs, perhaps marbled chocolate and vanilla, then had a memory flash back to my childhood when elaborate pink decorated tins of Viennese coffee flavoured with dried fig seasoning (can that really taste good?) used to be on sale. Maybe I could come up with a mini coffee meringue topped with fresh figs?
Finally I told myself to STOP and follow my own mantra of Less is More. I need not rush round the kitchen becoming frazzled before an evening at the opera. I filled the last corner of the box with a napkin, some disposable wooden cutlery (so much nicer than plastic) and the most elegant disposable plastic wine glass I could find. I then packed some half bottles of Hungary’s famous dessert wine Tokaji to serve alongside. Perfect.
Here’s the end result first with the box open:

and then closed ready for packing and transport to Clonter:

OK so that’s the overview, now for detail on the construction of the individual elements.
The Hotel Sacher recipe for Sachertorte is a closely guarded secret but fortunately it’s Mary Berry to the rescue. I used her Great British Bake Off recipe featured on the BBC Food website as the base for my Sachertorte cubes. Interestingly this is similar but not identical to the Sachertorte recipe featured in her Baking Bible. I doubled the recipe quantity given below and baked it in two 23cm (9 inch) square tins.
I then sandwiched the cakes together a generous quantity with sieved apricot jam flavoured with a little Amaretto liqueur (perfect as it is itself made from the bitter almond flavoured apricot kernels) and sharpened up with a spritz of lemon juice.
I trimmed the cakes, cut them neatly into 16 cubes and brushed each cube generously with more of that sieved apricot jam.
It was shaping up to be a warm, humid day so rather than a classic cream and chocolate ganache icing I chose to make the chocolate and butter ganache I’ve used before on the Ottolenghi golden clementine cake. You can find the recipe here. This worked a treat setting to a glossy sheen thanks to the honey and butter in the recipe. I needed to make a double quantity of the icing to coat all of the cubes but could probably have got away with 1 and a half times the recipe.
Finally, each individual cube was topped with one of those chocolate bats carefully transported home from Slattery’s and they were left in the cool cellar until being packed up in double white fluted cake cases later in the afternoon.


Moving on the Esterházy Torte. A classic version of this cake comprises a majestic 5 layers of nut flavoured cake sandwiched with nut and vanilla flavoured cream. The nuts might be toasted almonds or hazelnuts depending on your preferred version of the cake. There seem to be countless subtly different versions of this recipe out there so I combined features of several recipes and scaled the quantities down in order to come up with the recipe I give below for mini Esterházy tortes comprising just 2 cake layers sandwiching a layer of vanilla nut cream.
These were straightforward enough to make being similar to a macaroon batter but much easier to handle thanks to the differing proportions of egg whites, nuts and sugar.
For the filling, I reached for my failsafe Lenôtre vanilla buttercream recipe which I learned when making macarons a couple of years ago. To complete the vanilla cream I folded in some more of the toasted ground hazelnuts.
The next step before assembling the tortes was to ice the tops with the distinctive feathered icing which is an essential feature of the Esterházy torte. Despite my many years of baking this was to be a first for me and the result was going to be on show to 12 opera guests so no pressure… I decided to ice a few extra tops to make sure that at least 12 of the lids would make the grade. This proved to be a wise decision as there are plenty of pitfalls for the unwary…
The cake tops were first brushed with sieved apricot jam to create a barrier preventing the icing from being absorbed into the cake surface. I’d made my water icing using a newly available product on my local supermarket shelves, fondant icing sugar. I’d hoped this would give me the smooth glossy effect of true fondant icing but this stuff is a bit of a cheat as it’s merely regular icing sugar with a little added powdered glucose. This does give a nice sheen to the finished product but produces a slow-setting permanently soft icing which frankly is a pain to work with. Next time I will use ordinary icing sugar.
The contrasting colour in the feathered icing comes from melted dark chocolate. The addition of a little vegetable oil to the chocolate produces a softer slower-setting result giving you time to work the feathered pattern. I forgot the oil which made life difficult as by the time I had piped lines of dark chocolate onto a row of lids, the chocolate had set rock-solid before I had chance to try out my feathering skills.
I changed tack and piped a single lid with 3 neat parallel lines of chocolate and immediately ran the wooden skewer through in a perpendicular direction. This worked fine except that I set the lids down to dry at a slight angle and 5 minutes later the slow-setting fondant icing (see my comments above) had slid off onto the kitchen work surface. Very frustrating.
I managed to turn out 12 acceptable lids and left the rejects for home consumption later. Once the icing had dried for a couple of hours, it was time for final assembly. I chose to transport the Esterházy tortes in clear plastic clamshells designed for cupcakes and these proved to be perfect for protecting the delicate tortes. I place a torte base in the bottom of the clamshell, piped a disc of buttercream on top and gently placed the iced top-layer in position, applying just a little pressure to hold everything together.


On to the apricot compôte. This was relatively straightforward to make after the two complex mini-cakes, but with its sharp refreshing sweetness a very welcome element in the dessert box. I didn’t want a babyfood-smooth purée, nor did I want something resembling a can of apricot halves in syrup. What was required was something nice and thick but with a bit of chunky texture. I thought I could achieve the texture I wanted by gently poaching the peeled apricot slices in vanilla-scented sugar syrup, carefully draining the fruit then puréeing half of it before combining it with the remainder of the fruit cut into pieces. This worked a treat. The compôte was thoroughly chilled in the fridge before spooning neatly into small clear plastic deli-style containers.
The final step was to pipe my Greek yoghurt and vanilla cream into similar deli-style pots in a relaxed swirl – more elegant than just dolloping it in to the pots.


After 2 days’ work I was finally all done and packed up. The boxes and their contents travelled brilliantly and, sigh, were consumed in the interval in a matter of minutes.
Recipe for Sachertorte
Adapted from a Mary Berry Great British Bake Off recipe on bbc.co.uk/food. This quantity of cake batter makes a single layer cake. A double quantity is required to make 16 cake cubes.
Ingredients
140g plain chocolate broken into small pieces (or use professional baking drops or buttons)
140g unsalted butter, softened
115g golden caster sugar
½ teaspoon vanilla extract
5 eggs, separated
85g ground almonds
55g sifted plain flour
1. Preheat the oven to 170 degrees C (fan). Grease and line with silicone paper your chosen cake tin. This quantity of cake batter will make a slim single layer cake if baked in a 23cm round tin, or a chunky layer for a two layer cake if baked in a 23cm square tin.
2. Melt the chocolate over a pan of simmering water. Remove and cool slightly.
3. Cream the butter and sugar together very well until really light. There is no raising agent in this cake so the only lift comes from air incorporated at this stage and when the beaten egg whites are incorporated.
4. Add the cooled melted chocolate and vanilla extract and beat again. Beat in the egg yolks one at a time then fold in the ground almonds and sifted flour.
5. In a separate bowl, whisk the egg whites until they are stiff but not dry. Add about one third of the whisked egg whites to the chocolate mixture and stir will to mix in. This will lighten the mixture and make it easier to incorporate the remaining whisked egg white without beating all the air out.
6. Gently fold in the remaining egg whites.
7. Pour the mixture into the prepared tin and level the surface with a palette knife.
8. Bake for 40-50 minutes until well risen and the top springs back when gently pressed with your forefinger. The shallower 23cm square cake will cook more quickly whereas the deeper 23cm round cake will need a little longer in the oven.
9. Leave the cake to cool in the tin for 15-20 minutes then turn out onto a wire rack to complete cooling.
10. Glaze, ice, fill and decorate according to your chosen recipe and desired finish. A sieved apricot jam glaze topped with chocolate ganache icing is traditional.
Recipe for mini Esterházy Tortes
Makes 16-18 sandwich cakes (32-36 individual cake discs).
Ingredients
For the cake layers
210g egg white (whites of approx. 6 eggs)
250g golden caster sugar
125g ground hazelnuts, lightly toasted
2 and a half tablespoons flour
To complete
1 quantity vanilla buttercream
85g ground hazelnuts, lightly toasted
Sieved apricot jam
1 quantity thick water icing made with 200g icing sugar, a squeeze of lemon juice, a tablespoon of schnapps and water to mix
50g dark chocolate melted with a teaspoon of flavourless oil
Begin by making the mini cake layers. Preheat the oven to 150 degrees C (fan). Whisk the egg whites until foamy then add the sugar a couple of tablespoons at a time whisking after each addition. Continue whisking until the meringue mixture is stiff. Fold in the flour and toasted ground hazelnuts. Transfer the mixture to a piping bag fitted with a 1cm nozzle and pipe small discs 4-5cm in diameter onto baking sheets lined with silicone paper or a non-stick liner. Leave about 2cm space between each disc to allow air to circulate to achieve an even bake. They don’t spread as they bake. Bake for about 15 minutes until the discs are a light golden colour. Allow to cool on the baking sheets for 5 minutes or so before carefully transferring to a rack with a palette knife to complete cooling.
Prepare the vanilla buttercream using the recipe given in the link above. Stir in the ground almonds. Set aside.
Divide the cake discs into two halves, one group will be the tops and the other the bottoms. Brush the smooth side of the tops with sieved apricot jam and leave to set for a few minutes. Feather-ice the tops by piping 3 parallel evenly spaced lines of dark chocolate across the freshly applied thick water icing layer and immediately drawing a wooden skewer through the chocolate lines at right angles. The chocolate is easily piped from a small piping bag made from a folded triangle of greaseproof paper with a tiny hole snipped off at the pointed end. Each draw of the skewer should be evenly spaced and parallel to form the feathered pattern. Three or four draws of the skewer should be about right for these small cakes. The feathering technique is more easily explained with diagrams and pictures so I’d suggest looking first at a detailed cake decorating book or at some of the videos available online (search terms marbled or feathered icing) if you’re trying this for the first time.
Leave the iced tops to set for a couple of hours before final assembly.
Assemble the cakes by piping a disc of buttercream onto the cake base. Use a disposable piping bag fitted with a 1cm nozzle. Set the iced layer on top and press gently to adhere.
Recipe for stone fruit compôte
Ingredients
800g-1kg ripe but not overripe stone fruit (eg apricots, peaches, nectarines or plums) peeled, stones removed and sliced
750 ml water
375g golden granulated or caster sugar
1 vanilla pod, split in half
2-3 strips lemon peel
juice of a lemon
Make a syrup by bringing to the boil the sugar and water. Add the vanilla pod, lemon peel strips and lemon juice.
Poach the prepared fruit for 5-10 minutes until tender but not too pulpy. You may need to do this in batches.
Remove the poached fruit from the syrup with a slotted spoon. Purée about half of the poached fruit in a food processor or liquidiser. Cut the remaining poached fruit into bite sized chunks. Combine the fruit purée and chunks adding a little more poaching syrup if needed.
Chill until ready to serve. Don’t throw the deliciously scented poaching syrup away – keep it in the fridge and use as the base for a soft drink or cocktail.
Spinach pie and semolina cake from Greece
September 17, 2012 § Leave a comment
Spinach and semolina sound like school dinner hell rather than fond food memories don’t they? Trust me, they really can be good given the right treatment.
The summer holidays are over and the boys are back at school, though in George’s case this is the last time I’ll be able to say this as, all being well, he’ll be a college student next September. I’m still thinking longingly of our week spent in Greece in mid August. We went back to Paleros on the Ionian Coast, a straight repeat of last summer’s holiday but it worked just as well this year too.
The village streets are still lined with enticing little tavernas:

Who wouldn’t want to retreat in here for a leisurely lunch on a hot afternoon?
I love the geometric perfection of the Greek script on a taverna menu: 
Though an English menu is more practical for the majority of us:
I fact we confined our taverna visits mainly to the evenings and most lunches were picnics in little bays like this one, a short boat across the bay from Paleros:
And our picnic foods of choice were wedges of freshly baked spinach and cheese pie from Paleros’ bustling little bakery:
I’d carry these back from the bakery, crisp, savoury and still warm. I’ve sought out an authentic Greek recipe from George Moudiotis’ excellent and informative book “Traditional Greek Cooking – The Food and Wines of Greece” which I’ve adapted and given below. The widespread availability of ready made filo pastry and bags of washed and prepared spinach make this a cinch to put together.
To complete our picnic, we’d add tomatoes and ripe pears or watermelon wedges to the bag, plus a little sweet something from the bakery. The Greeks clearly have an extraordinarily sweet tooth and, sandwiched between east and west, their baking has a combined culinary heritage. The buffet table at our hotel would be crowned by over-the-top layered and decorated sponge cakes in the western tradition adorned with swirls of crème patissière and whipped cream, highly coloured icings and glacé fruit. My preference was for the more austere but deeply sticky and sweet middle eastern influenced pastries, kourabiedes, baklava, kadaifi and the like. Here’s the simple yet enticing display of these goodies at the local bakery, reverently screened as a protection from marauding insect life: 
I tried out the moist little lozenges topped with sesame seeds and a single decorative almond for the first time. I tried desperately hard with my phrase book modern Greek to find out their proper name but ended up with me and the bakery lady smiling and helplessly shrugging shoulders as I failed to understand what these cakes were called. Whatever they are called, they were dense, moist and syrup-laden, a great energy boost after a long swim:
Looking for what they might be in my Greek food bible “Traditional Greek Cooking” once again, I found a recipe for a simple syruped semolina cake called Revani. This is a traditional cake from Northern Greece which I think sounds a little less dense than the cake I tried but similar in flavour and appearance. I give my adapted version of the recipe below and will be trying it out over coffee very soon to bring back those memories of summer.
Recipe for Spanakopita – Greek spinach and cheese pie
Adapted from George Moudiotis’ “Traditional Greek Cooking – The Food and Wines of Greece”
Serves 6-8
Ingredients
900g spinach, washed, stems removed and roughly chopped
1 bunch spring onions, trimmed and chopped
150ml extra virgin olive oil
225g crumbled feta cheese
4 eggs, beaten lightly with a fork
3 tablespoons chopped fresh herbs – a mixture of flat leaf parsley and dill is good
salt and freshly ground black pepper
250g filo pastry, about 12 sheets
pinch grated nutmeg
Preheat the oven to 180 degrees C (170 degrees C fan).
In a large frying pan big enough to hold all the spinach, fry the chopped spring onions in 3 tablespoons of the olive oil until soft but not browned. Tip into a large mixing bowl and set aside.
Add the spinach to the frying pan and cook for about 3 minutes until wilted. Tip into a colander and press out as much excess water as you can. Add the drained spinach to the mixing bowl which already contains the cooked spring onions and add the feta, beaten eggs, chopped fresh herbs, salt, pepper and nutmeg. When seasoning, don’t add too much salt as the feta is already quite salty. Mix well to combine.
Brush a 4cm rectangular deep baking dish with oil. Metal is best to conduct the heat and cook the pastry. Choose a tin that is a little smaller than the dimensions of the filo sheets. Lay the first sheet of filo over the base letting the edges overhang. Brush the sheet with oil. Repeat until you have used half the sheets of pastry. This constitutes the base of the pie. Spoon over the filling, spreading it evenly over the pastry. Cover with the remaining filo sheets in a similar manner, brushing each one with oil as you layer up, not forgetting to brush the top sheet with oil.
Using a really sharp knife, score the top surface of the pie marking out 6 or 8 portions. Prick the surface of the pie evenly all over to give an additional way for steam to escape. Trim the overhanging pastry edges but still leaving a small border. Fold this small border over the top and press lightly to seal. Spritz the pie with a little water to prevent the pastry from curling and bake in the preheated oven for about 45 minutes or until the pie is golden brown and crisp.
Serve warm or cold.
Recipe for Revani – syruped semolina cake from Northern Greece
Adapted from George Moudiotis’ “Traditional Greek Cooking – The Food and Wines of Greece”
Serves 10-12
Ingredients
For the cake
225g golden caster sugar
6 eggs
5 tablespoons warm milk mixed with 1 teaspoon vanilla extract
225g fine semolina
150g self raising flour
2 teaspoons baking powder
pinch of salt
For the syrup
450g golden caster or granulated sugar
400 ml water
75g unsalted butter
2 tablespoons lemon juice
finely grated zest of half a lemon
To decorate
Toasted whole blanched almonds
Line a 12 inch round cake tin with baking paper. Preheat the oven to 180 degrees C (170 degrees C fan). Mix together thoroughly the semolina, self-raising flour, baking powder and salt. Set aside.
Using an electric mixer, whisk the eggs and sugar together at high speed for about 10 minutes, adding the milk and vanilla extract mix gradually, until the mixture is pale and fluffy. Sift the flour mixture over the whisked egg mixture in three batches, gently incorporating each batch with a balloon whisk trying to retain all the whisked air bubbles in the mixture.
Pour the mixture into the prepared cake tin and bake in the preheated oven for 40 minutes or until the cake is golden brown and cooked through.
While the cake is baking, make the syrup. Put the sugar and water into a medium saucepan and bring to the boil without stirring. Once the sugar is dissolved, boil for 2 to 3 minutes. Remove from the heat and add the butter, lemon juice and zest and leave to cool.
Spoon the cooled syrup over the hot cake shortly after it comes out of the oven. Do this carefully as you do not want the cake to collapse. Leave the cake in its tin to cool completely. Cut it into lozenges and decorate with toasted whole blanched almonds.
Cakes for Hansel and Gretel
July 29, 2012 § Leave a comment
The challenge for this year’s Clonter Opera (Cheshire’s answer to Glyndebourne) picnic was to produce a themed dessert which could be eaten during a 30 minute interval. This year’s production was Engelbert Humperdinck’s “Hansel and Gretel”, so a selection of German mini-cakes, plus sweets and the obligatory gingerbread seemed to fit the bill.

I love proper cheesecake, so a traditional German-style baked cheesecake cooked in a rectangular tin and cut into dainty squares was first on my list. I chose my recipe from my newly acquired baking book, Dan Lepard’s “Short and Sweet” and found it to be excellent. This was the “Classic Cheesecake” from p.458 and was everything a cheesecake should be – deep cream cheese flavour with hints of orange zest and vanilla and great texture. The Hobnob biscuit base was an inspired variation on the usual digestives and was neither too hard nor too soggy, but just right. You can see the cheesecake squares presented in pink foil cases in the picture above.
Talking of which, the dinky self-assembly cardboard three tier cake stands I used attracted at least as much interest as the cakes! These were a Caroline Gardner design, stocked by online supermarket Ocado and maybe also Waitrose and John Lewis too.
That much-bastardised 1970’s dinner party favourite, Black Forest Gâteau just had to be on the menu. Forget dry chocolate cake, too much buttercream and garish decoration, my version was constructed with featherlight chocolate génoise (I used Rose Levy Beranbaum’s recipe from “The Cake Bible”); kirsch-infused syrup; luscious smooth chocolate custard (another winner from Dan Lepard’s “Short and Sweet” book); white chocolate ganache which tastes and behaves like a super-stable whipped cream, great for a cake which has to sit in a warm room for a little time. The final decoration was a griottine-style morello cherry, a chocolate stick and for a final touch of bling, a shred of real edible silver leaf. The result was a delectable little mouthful:

So good in fact that I just had to put together another batch the next day for afternoon tea, this time with a double layer of sponge, fresh cherries and grated chocolate:

Both the chocolate génoise and custard are really good versions of these classic components and I’ve given both recipes at the end of this post.
Strawberry tartlets presented German style on a sponge cake rather than pastry base, completed my trio of mini-cakes. I used more of the white chocolate ganache and incorporated my mother’s trick of glazing the strawberries with redcurrant jelly for extra sweetness and shine. The cakes were finished off with a little edible gold leaf:

You can’t do Hansel and Gretel without a gingerbread house. I didn’t think a fully assembled gingerbread house would survive the minibus journey along bumpy country roads from home to Clonter so used the templates for mini gingerbread houses from the BBC Good Food site recipe here to make house-shaped biscuits. I didn’t use their gingerbread recipe though, opting for yet another Dan Lepard recipe from “Short and Sweet”, the gingerbread biscuit recipe from p. 243. Another winner, producing a dark, deeply spicy biscuit, its colour coming both from muscovado sugar and also a tablespoon of cocoa powder added to the dough, a neat trick producing a deep colour and rich flavour pointing up the spices but not overpowering them with obvious chocolate.
I decorated the biscuits very simply with white royal icing and a number 1.5 writing nozzle producing a stylish black and white effect:

A selection of old-fashioned sweets from Altrincham market’s pick and mix stall and Hale’s fabulous Gobstopper sweet shop (sugar mice, chevron lolly pops, candy canes, bon bons, comfits, sugared almonds..) plus squares of home-made fudge completed the spread. Shame the opera director had a slightly different vision of the story and went for a pyschedelic Affleck’s Palace style emporium complete with skateboard gear rather than a recognisable gingerbread house. Ah well, you can’t win them all…
Recipe for Chocolate Génoise
Adapted from Rose Levy Beranbaum’s “Cake Bible”. I’d recommend buying the book for all Rose’s invaluable tips and tricks though. This recipe is sufficient for a deepish 23cm diameter round cake. I wanted thinner sheets of cake so scaled up the recipe to a 7 egg version and baked two 25cm square trays of cake.
Ingredients
37g clarified beurre noisette
28g cocoa powder (I like Valrhona or Green and Blacks)
60g boiling water
4g vanilla extract
5 large eggs (250g shelled weight)
100g golden caster sugar
75g sifted plain flour
Preheat the oven to 170 degrees C (fan).
Warm the beurre noisette until almost hot and keep warm.
In a smallish bowl, whisk together the cocoa and boiling water until you have a smooth paste. Stir in the vanilla extract and set aside, covering the bowl with the whisk still in it with cling film if you don’t plan to use it immediately.
Mix the eggs and sugar together in the large mixing bowl from your Kenwood or similar mixer. Set the bowl over, not in, a pan of simmering water and stir constantly until the mixture is just lukewarm. Take care and do not allow the eggs to coagulate or you will end up with hard little lumps in the finished cake. The heating of the eggs helps stabilise the mixture when whisked which is helpful when the dense chocolate is mixed in. I wouldn’t bother with the heating for a plain génoise.
Remove the bowl from the hot water, dry it off and return it to the mixer. Whisk at high speed until the mixture has tripled in volume and leaves a trail when the whisk is lifted.
Take a couple of big spoonfuls of the egg mixture and whisk them into the cocoa mixture using a balloon whisk.
Sift the flour over the remaining egg mixture and incorporate thoroughly but carefully using a balloon whisk. Add the cocoa and egg mixture and stir with the balloon whisk until half-incorporated. Fold in the beurre noisette in two batches by which time everything will be thoroughly combined yet still aerated.
Pour immediately into the prepared cake tin (greased and base lined for a deep round tin; fully lined with baking parchment if you’re baking a sheet of cake in a shallow square or rectangular tin as I was) and bake for about 30 minutes. You can tell when the cake is done as the cake shrinks away from the sides just a little.
Turn out straightaway onto a lightly greased cooling rack and peel off the parchment after a couple of minutes.
Recipe for Chocolate Cream Custard
From Dan Lepard’s “Short and Sweet”. Makes enough to fill 30 mini cakes with plenty left over.
Ingredients
100g golden caster sugar
25g cornflour
25g cocoa powder (I like Valrhona or Green and Blacks)
2 teaspoons vanilla extract
225 ml milk (I used semi-skimmed)
2 egg yolks
50g unsalted butter cut into pieces
50g dark chocolate in small pieces (I like Valrhona Manjari buttons)
150ml double cream
In a heavy-based saucepan whisk the sugar, cornflour, cocoa powder and vanilla extract with the milk until smooth. Add the egg yolks and whisk again. Heat gently over a low to moderate heat beating with a wooden spoon all the time. As the mixture warms, gradually add the butter piece by piece, stirring all the time. As the mixture begins to thicken, beat hard to keep it smooth.
Remove from the heat, tip the mixture into a medium sized bowl (you’re going to add cream to the mixture later) and cover the surface of the custard directly with cling film to stop a sking forming. Leave to cool then chill in the fridge until completely cold.
When you’re ready to complete the custard, take it out of the fridge and remove the cling film. Using a hand-held electric whisk, whisk the custard at a slow speed. When the custard is smooth, increase the speed to medium and gradually whisk in the double cream until the mixture is very smooth, shiny and thick. The mixture will thicken up further to a consistency which can be piped and will hold its shape if returned to the fridge to chill for a while.
Champéry and the Tour des Dents du Midi
August 13, 2010 § Leave a comment
The range of seven peaks known as the Dents du Midi (Teeth of the South) sits high above the Rhône valley in Western Switzerland and is tantalisingly visible from the shores of Lac Léman (lake Geneva).
After staring at these dreamy mountains for years since I first visited the area back in the 1980s I was finally going to approach them on foot via the long distance footpath called the Tour des Dents du Midi. If you were really up for it you could complete the walk in 2 long days: we decided to opt for the 4 day option making our base the picturesque alpine village of Champéry in the canton of Valais.
Wending our way up the Val d’Illiez towards Champéry we kept seeing roadside stalls selling Valais apricots. The Valais is named after the mighty Rhône valley which dominates the region. It is the warmest and sunniest part of Switzerland and is famed for its red wines and its fruit trees. I’d previously experienced Valais fruit in the winter in the form of hideously strong schnapps, pomme (apple), williamine (pear) and the like. At the third roadside stall we just had to break our journey to experience the fruit in its much more pleasant undistilled form:

Delicious, ripe and juicy, much more appealing than the bullet-hard pellets that pass for apricots in supermarkets back home.
Our base in Champéry was the comfortable and good value Beau Séjour hotel at one end of the village main street. It’s pretty as a picture, all dark wood and pink geraniums and the annexe rooms where we slept were spacious and well-equipped. The hotel doesn’t serve meals other than breakfast but this was not a problem as we strolled down to the excellent Café du Nord for dinner.
The Beau Séjour does do a fine breakfast, the highlight of which for us was cooking our own pancakes on a dinky electrically heated tabletop device. Sadly, looking out of the window from our cost breakfast table, the weather outside was, exactly as forecast, grim. Undaunted, we merely donned our waterproofs and set off from the Grand Paradis chairlift carpark. We had 6 hours walking ahead of us including 900m of ascent.
The showers stopped intermittently and we were rewarded with views of precipitous slopes and alpine meadows. We took a lunch break at the Cabane d’Antème, pretty basic with building work audibly in progress. Soup was reconstituted Maggi or similar and coffee was instant but the chocolate cake was the real deal.
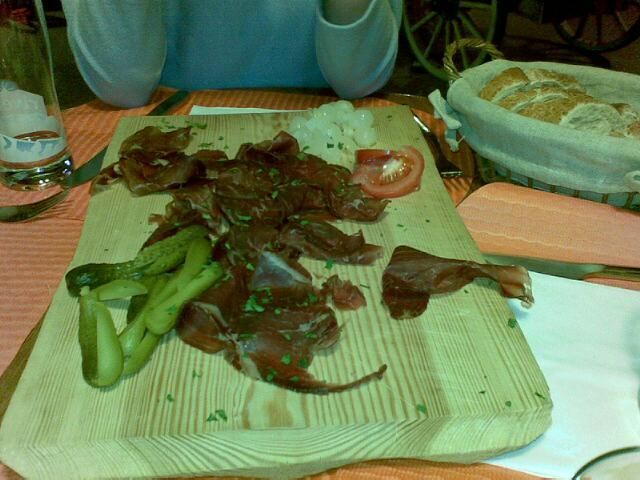
After another 3 hours’ trudging in the rain, the Alpage de Chindonne was a welcome sight bas we rounded our final corner. This was amazingly comfortable for a mountain hut, more like a small hotel, with prices too match! We were too late for the cheaper basic pasta meal, the répas du randonneur, so it was the à la carte option of viand sechée du Valais followed by the national Swiss potato dish, rösti.
Here is the board of viande sechée du Valais:
After a breakfast of bread and jam we set out on day 2 of our walk. Mercifully the rain had stopped and the sun broke through clouds and it became a beautiful day. A good thing too as we had 7 hours walking ahead of us. We spent the morning rounding the corner into the main Rhône valley arriving at the cliff top village of Mex in time for lunch. We then had a gruelling 1,000m climb up to the col du Jorat from where we could see down to our destination, the Auberge de Salanfe. By common consent this was the best hut of the tour. It has a spectacular lakeside setting, comfortable rooms, good food and efficient and friendly service. Dinner, a homemade vegetable soup and emincé de boeuf (beef casserole) with rice and vegetables, was wolfed down by all.

Day 3 turned out to be a relatively short 3 hour walk over the col to the Cabane de Susanfe as our planned peak, the Haut Cîme, 3,257m, turned out to be unobtainable because of the quantity of fresh snow down to 2,400m. We arrived at the Cabane at around lunchtime and spent a lazy afternoon in the sunshine rehydrating first on sirop de mélisse (homemade lemon balm cordial) and later on a microbrewery beer from Sion. Dinner was packet cream of asparagus soup followed by chilling con carne, then apple sauce for pudding. Sounds a little odd but it all tastes good after a day’s hiking. The Cabane de Susanfe is a genuine Swiss Alpine Club hut with just a coomunal dormitory and hut bunk sleeping arrangements. This proved the most difficult part of the walk: sharing a mattress with a pot-bellied snoring stranger is not my idea of fun….
After a slightly Spartan breakfast of homemade bread (good but not enough of it), jam and instant hot chocolate, we set off on the final leg of the journey back to Champéry and civilisation. After a tricky first hour we were through the steepest section of the walk, the Pas d’Encel, effectively the jaws of the valley. The buvette de Bonavau made a welcome break with tempting homemade fruit tarts on display:

Too soon it was back to civilization in Champéry. It was a sunny Sunday lunchtime and we were pleasantly surprised to find both the bakery open and a little market in full swing in the village centre. We stocked up on bread – both Valais rye bread with walnuts plus white bread for the softies in our party. The cheeses were a wonderfully ripe and stinky Tomme de Bruson from the neighbouring valley and a local artisan-made rinded goat cheese. The salami was chewy, flavoursome and flavoured with génepi. I think this variety of peach is called doughnut – they were small, fragantly white-fleshed and juicy.
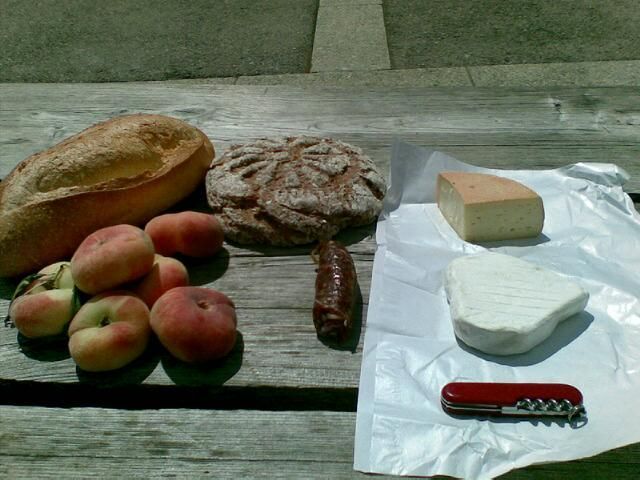
A perfect picnic to conclude a successful walk, even if the Haut Cîme remained out of reach this time.
Riverside picnic
June 24, 2010 § Leave a comment
At this time of year, my thoughts turn to the perfect riverside picnic. I blame my obsession with this idea on a photograph in my mother’s copy of “The Robert Carrier Cookbook” which, as a child, I would turn to repeatedly. The picture showed a bottle of Loire white wine chilling in a gently flowing river somewhere in the green heart of La France Profonde. Mature trees in full leaf shaded a table set for two on the river bank. The food on offer was freshwater crayfish and, I think, quenelles de brochet (delicate little poached pike mousses).

So now once a year my family indulges me in living out this fantasy albeit in a less elaborate form than the Robert Carrier original. When good weather is forecast for a weekend in late spring we pack up a hamper of suitable food and head off for the limestone dales of the Peak District.

What constitutes suitable foods for such a picnic? I draw inspiration from the surrounding landscape. Watercress has to feature as it grows wild in the limestone streams, also river fish, generally trout as it’s easy to come by. I give a recipe below for a quick and easy smoked trout pâté. Young goat cheese has become part of the ritual and tastes good with the watercress and a loaf of walnut bread. Nantwich based Ravens Oak dairy (now owned by Butlers) produces very likeable goat cheeses which, conveniently are stocked by Marks & Spencer. I picked up both their Kidderton Ash and regular Ravens Oak goat cheeses for this picnic. You can have a look at the Butlers range at www.butlerscheeses.co.uk The Cheese Hamlet in Didsbury stock a lovely Ticklemore goat’s cheese from Devon in the summer months too.

Asparagus is in season and adds a festive note to the proceedings. I always roast rather than steam it now as it’s a foolproof method that concentrates its flavour. A cool jambon persillé would be good too – the chunks of pink ham in its bright green parsley jelly recalling the clear river water and flowing water weed.
This year, I took along a chilled soup – a refreshing Spanish Ajo Blanco. This is an odd-sounding mixture of bread, almonds, garlic, sherry vinegar and plain cold water which which, when blended to a thin purée, chilled and garnished with halved grapes turns into an infinitely refreshing chilled soup, much more than the sum of its disparate parts. The soup seemed very appropriate as wild garlic was everywhere in all its pungent glory.

A picnic wouldn’t be a picnic without cake to finish. I try and keep the cool green theme going even here. Jane Grigson’s gooseberry pound cake has been successful on a previous picnic, but this time we took along wedges of my courgette and lemon cake: see my previous post https://rhubarbfool.co.uk/2010/05/22/relaxed-cooking-for-the-holidays/

Here are two of my recipes – both very simple for summer lunches at home as well as picnics
Recipe for smoked trout pâté
Ingredients
4 smoked trout fillets (or 2 whole smoked trout if you can buy them this way)
6 oz cream cheese
1 teaspoon grated horseradish or wasabi
juice of half a lemon
black pepper
If using whole trout, skin them, fillet them and place the trout fillets roughly broken up in a food processor. If you’re using pre-prepared trout fillets the skinning and filleting will already have been done for you. Add the remaining ingredients to the food processor bowl and pulse carefully until the desired texture is achieved. I like a slightly rough texture so this doesn’t take long. Check for seasoning and add more horseradish, lemon and pepper to taste. The wasabi was an inspired discovery one day when I ran out of horseradish. Pile into a bowl to serve (or box to transport to your picnic. Good with oatcakes or walnut bread.
I have no current photos of trout in pâté form but here are the real thing swimming in the Derbyshire River Wye, home to both rainbow and wild brown trout. We have a favourite footbridge for fish spotting and feeding – the fish are very partial to leftover bread and crumbs from Duchy Originals gingered biscuits!

Recipe for Ajo Blanco
Chilled Spanish garlic, bread and almond soup sometimes referred to as white gazpacho.
Ingredients
4 oz blanched almonds – try and use Spanish ones ie Marcona which Sainsbury’s stock as part of their Taste the Difference range
8 oz good white bread (ie from a decent unsliced loaf with a bit of flavour), crusts removed
salt
2-3 tbsp best quality extra virgin olive oil
2 tbsp best quality sherry vinegar
1 pint chilled water
2 cloves garlic, sliced
few seedless grapes, green are traditional but black fine as well

Dip the bread in cold water, squeeze out the excess and place in the goblet of a liquidiser along with the remaining ingredients except the garlic and grapes. Blend until smooth. Pour into a suitable container, add the sliced garlic which will gently infuse its flavour, and chill for several hours or overnight. Most ajo blanco recipes tell you to blend the garlic along with the other ingredients but I found that garlic pulverised in this way becomes unpleasantly intense in the finished soup. Serve garnished with halved grapes.
Make your own mountain bars
March 10, 2010 § 2 Comments
March heralds the arrival of spring, and most importantly the ski-touring season. I have a trip planned to the Vanoise in France mid month and Tim to Glarus in Switzerland a week later, so time to make a batch of mountain bars to provide energy on the hill.
I found this recipe a few years ago on the University of Oregon Library Staff Association website. They call it “Johnny Crunch” and recommend it as the ideal food for skiing, hiking, in fact any kind of strenuous outdoor activity.
Here’s a bar shot on location at the Kinder Downfall in the Peak District last autumn.

The bars taste good, are high in calories, are compact for slipping into your pocket, they don’t freeze to a tooth-shattering lump at low temperatures, nor do they melt at warmer ones. Oh, and there’s the added bonus that you can rub the almond oil they contain into your skin for an inpromptu handcream!
Once you’ve assembled the ingredients, it’s merely a case of mixing them up:

…then pressing into a suitably sized tin:

Recipe for Mountain Bars
Thanks to the University of Oregon Library Staff Association for this recipe. The quantities are all in American cups (US cup is 8 fl oz). Helpfully a standard 370g jar of honey, peanut butter etc equates approximately to a US cup so the measurements can be done by eye which makes life easier with dense sticky ingredients.
Most of the ingredients can be picked up easily at your local supermarket. Try a health food shop for the almond butter and barley malt/date syrup.
Note for those on gluten free diets. As far as I’m aware, the only gluten-containing ingredient in this recipe is the barley malt syrup. If you use date syrup instead, you have the perfect high energy gluten free snack. I skied with aspirant (now fully qualified) mountain guide Mark Thomas last year. Mark doesn’t tolerate gluten which makes life very difficult in the mountains where much of the staple food on offer (bread, pasta, cake etc) contains gluten. This one’s for you Mark!
Ingredients
2 cups puffed rice (I used rice crispies made by you-know who)
1 and 1/2 cups chopped walnuts or other favourite nuts
1 and 1/2 cups sesame seeds
3/4 cup runny honey
3/4 cup crunchy peanut butter (I like Whole Earth)
1/2 cup raisins
1/2 cup dried cranberries
1/2 cup barley malt syrup (or date syrup for a gluten-free option)
1/2 cup almond butter
1/2 cup chocolate chips
Mix all the ingredients together in a large bowl with a wooden spoon. The mixture should be very firm and sticky. If it seems not firm enough, add more rice crispies and sesame seeds to give the correct consistency. Press into a 9 by 9 inch tin (or rectangular tin of similar area). DO NOT BAKE. Refrigerate overnight then cut into small squares and wrap individually in cling film. Makes 25-30 squares. Store in fridge or better still freezer if not using straightaway.
Variations: you can substitute linseeds for some of the sesame seeds and dried goji berries for some of the dried cranberries.
Clonter opera picnic: what to eat with Rigoletto
October 5, 2009 § Leave a comment
Our friends Emma and Andrew organise a trip to Clonter Opera each October for an ever-increasing group of friends and neighbours. Clonter is the Cheshire equivalent of Glyndebourne and strikes a harmonious balance between serious music-making and jolly social occasion. Clonter specialises in giving young singers fresh out of conservatoire a leg-up in establishing their careers. For example, we heard New Zealand bass baritone Jonathan Lemalu at Clonter a few years ago and he’s now made quite a name for himself as an up-and-coming artist.
Enough of music and onto the serious business of the food. What the Clonter audience usually does is arrive at 6.30 and unpack hampers onto the tables provided in the barn seating area for drinks, canapés and first course. The performance then starts at 7.30 with a 70 minute long supper interval, just long enough for main course and pudding. We’re old hands now and know there is never time or appetite for cheese or coffee so we cut the stress and don’t bother with these now.
We were a group of 19 this year and Emma asked me if I might do some platefuls of nibbles to hand round which would serve both as canapé and as first course without the need to be formally seated. Nice idea but allowing 5 items per person and rounding up, this would necessitate making 100 canapés which is a tall order for a busy Saturday afternoon. I set myself the additional challenge of theming the canapés with the opera which was Rigoletto.
The opera is set in Mantua and was given its first performance in Venice. There is plenty of drama in Verdi’s dark tale of debauchery and deception but it is light on frivolous drinking and feasting scenes. The dreadful climax of the opera comes when court jester Rigoletto realises that the body in the sack he is about to hurl into the river is not that of the evil Duke of Mantua, but that of his beloved only daughter Gilda.
A few minutes mulling over the opera plotline and I came up with the idea for Northern Italian finger-food featuring miniature filo pastry sacks. Is this in poor taste and taking theming a little too far? Yes probably but I’m afraid that is how my mind works…..
Anyway without dwelling overmuch on my foibles, the chosen canapé menu was:
Stuffed olives. Waitrose do some gorgeous large Kalkidis (sic) olives stuffed with fruit compôte – not entirely authentically Italian but nevertheless very good. Surely these should be spelt Halkidikis or at the very least Kalkidikis? Looks like a syllable has gone missing. Maybe I’ll write to Waitrose to point this out.
Twists of parma ham artfully spiralled around rustic breadsticks – both elements picked up at favourite local shop Goose Green Delicatessen
Bruschetta with Gorgonzola dolce, walnuts and slices of fresh pear (painstakingly dipped in lemon juice to stop them going brown)
Mozzarella, tomato and basil bites – individual buffalo mozzarella bocconcini balls threaded onto a cocktail stick with a mixture of red and yellow cherry tomatoes and a single perfect folded basil leaf
All the above were pretty straightforward to put together – essentially an assembly job with deli ingredients. The pièce de résistance was to be the Mantuan miniature filo pastry sacks – Mantuan because of the chosen filling of roast butternut squash, sage and parmesan. I visited Mantua on a tour of Northern Italy a few years ago now. Its most famous dish is Tortelli di Zucca – ravioli filled with pumpkin, served with a simple sauce of sage-flavoured butter. I took inspiration from this dish for my sacks. Butternut squash is a pretty good substitute for the local Mantuan pumpkin having the necessary sweetness and depth of flavour once it’s been given the roasting treatment. I cut the squash into chunks and tossed them in a tablespoon or so of olive oil into which I’d thrown a few snipped purple sage leaves from the garden and some sliced garlic cloves, then baked them in the oven for about an hour. My baked squash became intensely savoury before being incorporated into the filling for the filo pastry sacks.
Here is the beautiful orange squash ready to go into the oven:

And here are the finished canapés ready for serving on our Clonter picnic table. All disappeared in a fraction of the time they took to prepare.

Almost forgot to mention that the performance of Rigoletto was a triumph – fantastic singing and inspired casting. One of the best performances I’ve seen in ages.
The recipe of my own devising for the Mantuan filo pastry sacks follows. These would have been best served warm but were in fact still pretty good at room temperature having been transported from kitchen to Clonter.
Recipe for Mantuan filo pastry parcels
Makes 20 parcels
Ingredients
1 medium butternut squash, peeled, deseeded and cut into 1 inch chunks
8-10 sage leaves, roughly chopped
3 cloves garlic, chopped
2 tablespoons light olive oil
Sea salt and freshly ground black pepper
1 egg yolk
1/2 teaspoon freshly grated nutmeg
2 oz finely grated parmesan or grana padano
270g pack filo pastry sheets
2 oz melted butter, maybe more if required
Make the filling. Peel, deseed and chop the squash into chunks. In a large bowl, toss the chunks with the oil, sage and a little salt and pepper and tip the whole lot onto a shallow baking tray lined with baking paper to avoid the squash sticking. Bake at 200 degrees C until the squash is cooked through and is become deliciously slightly charred and toasty round the edges. Don’t take it too far – you are looking to intensify the squash flavour, not burn it.
Let the baked squash cool a little then tip it into a roomy bowl and go in with a crinkle-cut chip cutter to reduce the squash to a chunky not too smooth purée. Add the cheese, nutmeg, and egg yolk, mix, then taste and adjust seasoning if necessary. If you are concerned about eating raw egg yolk, do the tasting bit before mixing in the egg yolk.
Now form the parcels. Melt the butter in a small pan and allow to cool a little. From memory, the pastry packet contains 10 large sheets folded pastry. Begin by cutting these 10 sheets neatly in half to make 20. Put aside and cover 10 of these half sheets and work with the other 10. Filo pastry is very thin and dries out quickly so you need to keep covered what you are not using in the next few minutes. Cut your ten half sheets in half again to make 20 smallish squares.
For each parcel, take 2 squares and lay them out on a pastry board. Brush each square scantily with melted butter and lay one one on top of the other at a 90 degree angle to create a rough star shape. Place a generous teaspoon of the squash filling in the centre and pick up and roughly twist the pastry together to create a sack or money-bag effect. Dab the formed parcel with some additional melted butter. Place the completed parcel onto a metal baking sheet. Continue until you have 10 parcels then gauge whether you need some more melted butter and repeat the process with the other half of your pastry.
Bake the parcels at 180 degrees C for 15-20 minutes until the pastry is golden brown and becoming crisp in parts. Cool on a rack.
Train picnic: dining in style
September 12, 2009 § Leave a comment
It was my birthday on Friday 11 September. Until recently this was not a noteworthy or memorable date and sadly it is now for all the wrong reasons. I chose to celebrate quietly this year by attending the finals of the Leeds Piano Competition. Music may be the food of love but I have been married to Tim now for 16 years and I need more solid sustenance. A picnic on the train as we journeyed across the heather-clad Pennines from Manchester to Leeds was the obvious solution.
Where to look for inspiration for this special picnic? First stop was New York Times food writer Amanda Hesser’s book “Cooking for Mr Latte” a chronicle, with recipes, of her courtship with future husband. Chapter 26 is entitled “Fine Dining in the Sky” and contains some excellent advice which is easily transferable to a train journey.
Hesser’s general advice is “the food must be compact and light, yet it cannot be skimpy. It must include favorite food like cheeses, cookies and olives, and it should in some way be lavish.” Suggestions to pack include salted nuts, especially delicious salted almonds from Spain, a chewy country roll and a nutty, soft cheese. Further recommendations are excellent cured meats, salads prepared with aged vinegars and nut oils, fresh herbs and homemade mayonnaise. Bought treats are suggested to complete the meal – a tart, cake or petit four or a caramel-filled chocolate.
Next stop was the unlikely sounding “Constance Spry Cookery Book”. Chapter XXXIV is “Menus, Parties and Food for Special Occasions and contains an apt little section headed “Train Food”. Who would expect that an English cookery book first published in 1956 could be such a repository of enticing food ideas?.
Ms Spry’s general advice about train food is as follows: “The primary qualification about such food is that it shall taste fresh and be really appetizing. It should never the bear the faintest trace of paper flavouring, something not so easy to avoid as one might think.”
She goes on to describe a delicious meal made by a family member for small party going up to “the far north” (Manchester? Scotland perhaps! the destination is never specified). It makes delectable reading:
“Each of us was handed when we got into our sleepers a small, neat cardboard box containing two little screw-top cartons and other small packages. In one carton was a perfect freshly made lobster salad in a delicious dressing, the second contained fresh fruit salad of peaches, strawberries, and orange. Crisp, poppy-seed-sprinkled rolls were quartered and buttered, and a Porosan bag held the crisp heart of a Cos lettuce. There were small cream cheese rolls made by taking two short pieces of celery, filling the hollow made when they were put together with cream cheese, and rolling the whole in brown bread and butter…”
Suitable inspired, I made by own preparations. Visits to the deli and greengrocer provided me with Spanish salted almonds, extra large stuffed green olives and thinly sliced meltingly soft Bellota ham accompanied by crisp celery sticks and crunchy radishes. These would be served with chilled champagne to begin the meal. Next, I took my cue from Constance Spry and prepared a simple but delicious lobster salad, combining new potatoes, soft-boiled quail eggs and squeaky blanched green beans with the diced lobster meat. The whole lot was packed into a carefully lettuce lined food storage box and topped with a dollop of wobbly yellow homemade mayonnaise flavoured with lemon zest and a little chopped tarragon. Next was a ripe St Marcellin cheese served in its own dinky indivdual terracotta pot. I then put together my favourite simple fruit salad of sliced white nectarines in passion fruit pulp. A quick trip to the bakery provided us with fresh rolls and cherry and almond tartlets, which along with half a bottle of Chateauneuf du Pape completed the preparations. The whole lot was packed into a small wicker basket along with forks and a couple of glasses and we were off!
It was all just as good as it all sounds as I hope the pictures below demonstrate. It definitely beats the usual railway offering of a pack of peanuts and a curled-up pre-pack sandwich hands down!


