
Shortbread
September 10, 2016 § Leave a comment
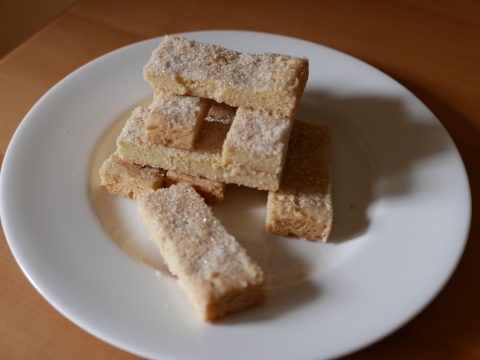
Shortbread is the classic British, or more properly Scottish, biscuit. With just three ingredients, flour, butter and sugar balanced in the baker’s golden ratio of 3:2:1 it’s sublime in its simplicity, the perfect riposte to an oversized cookie or indeed the overworked esoterically flavoured creations on offer on our TV screens at the moment courtesy of the Great British Bake Off.
Shortbread is relatively straightforward to make at home (though as I have discovered there are several ways to go wrong) but you can buy great shortbread too. One of my favourite commercially produced shortbreads is that made by Dean’s of Huntly. On a visit to Aberdeenshire not so long ago (mainly focused on sampling Speyside whiskies) we found ourselves in the small town of Huntly and took the opportunity to visit the factory showroom and café, learning the story of how Helen Dean started baking and selling shortbread from her family kitchen in the early 1970s. Dean’s shortbread truly is melt-in-the mouth and the list of ingredients for the premium all-butter shortbread is admirably simple.


So if Dean’s sets the benchmark, where does my own shortbread recipe come from?
It’s a combination of various different recipes plus a little trial and error.
In contrast to the brevity of the ingredients list, there are a number of aspects to the method for making and baking of shortbread that warrant a little further discussion or explanation.
1) Ratios
I referred above to the baker’s golden ratio of 3:2:1. Where does this come from you may be wondering?
I have 3 unimpeachable sources. The first is my mother-in-law’s handwritten recipe which calls for 6oz flour, 4 oz butter and 2 oz sugar (incidentally this is also what she does to make the best crumble topping); the second is Jane Grigson’s shortbread instructions from her book “English Food” (sorry Scotland!); the third is a classic shortbread recipe attributed to Katharine Robertson from the book “Seasonal Cooking” by Claire MacDonald of MacDonald who runs a famous hotel, Kinloch Lodge on the Isle of Skye.
2) Substituting some of the flour for cornflour, semolina or ground rice
The received wisdom seems to be that you can substitute up to one third of the plain flour with one of the above alternative starches. I have found that shortbread made with just plain flour has an amply crumbly and melt-in-the mouth texture if properly baked so why make things more complicated than they need to be?
3) What sort of butter is best?
I like to use a salted British butter, ideally a farmhouse one as this gives the best flavour to the finished biscuit. I think a little salt in the recipe lifts the flavour and if this is added by way of salted butter there is no danger of over-salting the dough. British butter is generally made from straightforward pasteurised cream and is known as “sweet cream” butter. Butter from the continental mainland e.g. Lurpak or the many French butters available are generally made from cream that has undergone lactic fermentation. This gives butter with a fresh, clean flavour but for shortbread making I prefer the richer taste of a sweet cream butter.
4) What sort of sugar is best?
Some recipes call for icing sugar but as far as I’m concerned, caster sugar is the way to go helping to achieve the desired crumbly texture. I also think that golden caster sugar gives an extra depth of flavour to the finished biscuit.
5) How should the ingredients be combined?
Some recipes suggest rubbing in the butter, flour and sugar whereas others suggest creaming together the butter and sugar and then working in the flour. I’ve tried both methods and find that it makes no difference. I find it easiest to start by creaming the butter and sugar in my Kenwood mixer and I was pleased to see that the legendary Helen Dean started off her family shortbread-making business using a trusty Kenwood mixer (proudly on display at the company’s HQ in Huntly – see photo above) so I feel I’m on solid ground here.
6) To roll or not to roll?
Several recipes suggest rolling out and cutting shortbread dough into shapes. Good luck to you if you can manage it! There is no way I’d attempt to roll out this type of dough as I find it just to hard to work with which is why I press my dough into a tin and cut it into fingers when baked. There are other recipes available for crisp little sablé-type biscuits that contain either egg yolks or whole eggs which are more suitable for rolling-out and cutting into shapes if that’s what you’re looking to make.
7) How long to bake and at what temperature?
Different recipes contain vastly different instructions on this aspect. As far as I’m concerned, relatively low and slow is the way to go which is why I suggest a baking temperature of 150 degrees C fan and 45 minutes’ cooking time. If you like a paler shortbread you might consider dropping the oven temperature by a further 10 degrees – Claire MacDonald’s recipe referred to above calls for a conventional oven temperature of 150 degrees C and a baking time of 1 hour.


Traditional shortbread
Makes enough to fill a standard rectangular Swiss roll tin (mine is 33cm by 23cm by 2cm) which when cut into fingers yields 36 individual biscuits. The ratio of flour to butter to sugar is the simple to remember 3:2:1 so you can readily alter the quantities to suit whatever tin size you have.
Ingredients
250g salted British butter
125g golden caster sugar (plus a little more for sprinkling afterwards)
375g plain white flour
Line the tin using a sheet of baking parchment carefully trimmed to fit. I do this by cutting a sheet of parchment slightly larger than my tin, pressing it into the tin to mark the division between base and sides then carefully snipping the paper at each corner at right angles then folding in the sides origami-style to create a 3D lining. If this sounds too complicated then just line the base of the tin.
Making the shortbread dough is easily done in a stand mixer but works well using a large bowl, wooden spoon and some elbow-grease too.
Cream together the butter and caster sugar thoroughly until the mixture is a little lighter in colour. Add the flour in 3 or 4 stages, mixing until well incorporated. The end result should be a crumbly dough that barely holds together and looks like badly made shortcrust pastry.
Tip the dough into the lined tin and spend a few minutes carefully pressing and distributing the dough evenly in the tin. You can do this using any combination of your knuckles and fingertips, a metal spoon or a small crank-handled palette knife. Prick the dough all over with the tines of a fork. I think this helps the dough to bake through more evenly, it looks attractive and importantly creates tiny pockets in the baked surface allowing the final sprinkling of caster sugar to adhere better to the biscuits.
Place the tin of shortbread dough into the fridge for at least 15 minutes to chill and firm up. It can be left into the fridge for several hours, even overnight if that suits your timetable.
When you are ready to bake, preheat your oven to 150 degrees C fan. Bake the shortbread for about 45 minutes until a light golden colour throughout. Judging the right degree of baking is perhaps the hardest aspect of this recipe and will probably require a degree of trial and error depending on how accurate your oven temperature is. It shouldn’t be too dark a colour – baking long and slow is the way to go. Also, if the shortbread is baked too long it becomes too hard and brittle and will shatter when cut into. If underbaked it will lack flavour and have a claggy rather than melt-in-the-mouth crumbly texture. When it is baked just right it will still be somewhat soft when cut into while still warm but, fear not, it will firm up to the right crumbly texture when cooled.
Once baked, remove from the oven, immediately carefully cut into fingers of the desired size (I cut mine lengthwise into 3 long strips then crosswise into 12 strips to produce 36 fingers) and sprinkle the surface with a little more golden caster sugar. Leave to cool completely in the tin.
Lamb (or vegetables) for a springtime celebration
April 8, 2015 § Leave a comment
Last weekend, some 50 family and friends descended on the Northern Lake District hamlet of Fellside near Caldbeck to share our friend Bruce’s 50th birthday. As my contribution to the celebrations, I offered to cook a meal for all the guests staying over on the Saturday night.
This is the menu I put together with its foundations in the Lake District classics of Herdwick lamb sourced from Yew Tree Farm in Rosthwaite and Sticky Toffee pudding, a recipe that originated at Ullswater’s Sharrow Bay hotel.
Menu for Bruce’s Saturday night
Olives
Hummus
Tzatziki
Dukkah and olive oil
All with pitta
*****
Herdwick lamb tagine
Seven vegetable tagine
Both with preserved lemons and harissa
Couscous
Date and orange salad
Root vegetable slaw
Chargrilled broccoli with chilli and garlic
*****
Sticky toffee pudding
Toffee sauce and cream
Cheeseboard with water biscuits and Winter Tarn Farm organic butter
Mrs Kirkham’s Lancashire
Keverigg (like Caerphilly) from Winter Tarn Farm near Penrith
Burt’s Blue from Altrincham


The lamb tagine/sticky toffee pudding formula is a tried and tested way of feeding a crowd and I’m indebted to my friend Shelley for introducing me to this lamb tagine recipe which can be made ahead of time and will appeal even to those who, like me, are not lovers of stewed lamb. The fell-bred Herdwick lamb shoulder becomes meltingly delicious, sweet and spicy after two and a half hours of slow-cooking.


And for those who prefer vegetables to lamb, I offer a recipe for a Moroccan-inspired seven vegetable tagine. The vegetables are given flavour twice over first by being marinaded in olive oil, garlic and harissa and second by being roasted in a hot oven to concentrate their flavour further. As the sauce is made from pureéd vegetables and a little stock, this recipe is both gluten and dairy-free, an added bonus when feeding vegetarians with different dietary requirements.


Both recipes are straightforward to make, freeze and reheat well and are equally good eaten for supper at home or scaled up for a celebration.
Contact details for Yew Tree Farm, Borrowdale (for Herdwick Lamb via mail order or in person from the farm shop)
017687 77675
http://borrowdaleyewtreefarm.co.uk/herdwick/
Joe and Hazel Relph
Yew Tree Farm
Rosthwaite
Borrowdale
Cumbria
CA12 5KB
Tagine of Herdwick lamb
Adapted from Antony Worrall Thompson recipe on the BBC Food website. Serves 6 generously or up to 10 if served with salads and side dishes. Doubled up, this fits comfortably into a preserving pan and if making ahead and freezing, the double quantity can be ladled into 5 pour and store bags each serving four people and holding 1.1 litres/kg tagine.
The quantity of spices given in the recipe if measured accurately with cook’s measuring spoons will give quite a spicy tagine, particularly so if your spices are fresh. If you prefer a milder tagine, put in a quarter (for a mild end result) or half (for a medium end result) of the stated quantities of cayenne, ground ginger and black pepper. Replace the hot spices with more of the milder ones (paprika, cinnamon and turmeric). Taste the sauce half way through the cooking time and crank up spices according to your taste at that stage.
Ingredients
1 teaspoon cayenne pepper
2 teaspoons ground black pepper
1 and a half tablespoons mild paprika
1 and a half tablespoons ground ginger
1 tablespoon turmeric
2 teaspoons ground cinnamon
1 boned shoulder of Herdwick lamb, trimmed carefully to remove excess fat and sinew and cut into 5cm chunks. There should be approx 1kg trimmed weight of meat
2 large onions, very finely chopped in a food processor (original recipe calls for grated onion)
2 tablespoon light olive oil
2 tablespoon argan oil
3 cloves garlic finely chopped
570ml tomato juice
400g can chopped tomatoes
115g natural colour (unsulphured) dried apricots, halved
55g Deglet Nour dates, stoned and halved
55g organic sultanas
85g flaked almonds
1 teaspoon best quality saffron stamens (I like Brindisa Belefran brand from Spain)
570ml lamb stock
1 tbsp clear strong tasting honey (I like heather honey)
1 can drained rinsed chickpeas
chopped fresh flatleaf parsley and coriander to garnish
Combine the dried spices in a small bowl and mix well to combine. Place the trimmed lamb pieces in a large bowl and toss together with half the spice mix. Cover with cling film and refrigerate overnight.
The next day, preheat your oven to 140 degrees C fan.
Heat 1 tablespoon light olive oil and 1 tablespoon argan oil in a large casserole dish. Add the finely chopped onion and the remaining half of the spice mix to the pan and cook over a gentle heat for about 7 minutes. Add the chopped garlic and cook for a further 3 minutes then turn off the heat.
While the onion and spices are cooking, heat the remaining 1 tablespoon each of olive and argan oils in a large frying pan and brown the pieces of lamb a few at a time.
Add the browned lamb pieces to the casserole along with any juices. Deglaze the frying pan with a quarter of the tomato juice and add these juices to the pan.
Add the remaining tomato juice, chopped tomatoes, dried fruits, flaked almonds, saffron, lamb stock and honey to the casserole dish. Bring to the boil, cover, place in the oven and cook for 2 and a half hours. Cool, skim off and discard any excess fat. Add the chickpeas, stir in well and heat through when ready to serve. Garnish generously with chopped fresh herbs and serve with couscous.
Seven Vegetable Tagine
Source: adaptation and combination of several recipes from Paula Wolfert’s book “Moroccan Cuisine”. Apparently, in both Fez and Marrakesh, the number 7 is considered lucky and this recipe has both seven vegetables and seven flavourings so is doubly so.
This recipe was originally devised for a Moroccan-themed party to suit a vegetarian family member who cannot eat tomatoes.
Serves 7-8 as a main course; 12-15 as a vegetable accompaniment
Ingredients
The 7 vegetables
1 butternut squash, peeled and quartered
2 medium aubergines
2 red peppers
1 medium turnip (not swede), peeled and quartered
3 medium onions, peeled
1 large bulb fennel, trimmed
1 can white cannellini beans (400 g can, drained weight 225g) drained and rinsed
4 tablespoons olive oil
The 7 flavourings
4 crushed cloves garlic
3 teaspoons harissa
3 tsp cumin seeds
1-2tsp salt
few twists pepper
2 tsp dried thyme
1 generous pinch saffron threads
Three quarters to one pint vegetable stock (I use Marigold vegetable stock powder)
Cut all the vegetables, other than the beans, into bite sized chunks (roughly 1” cubes). Don’t worry if the the onions and fennel fall apart.
Put the flavouring ingredients except the saffron into a large mixing bow, add the olive oil and, tip in the vegetable chunks (but not the beans) and mix everything together with your hands, making sure all the vegetables are well coated with the flavoured oil.
Tip into large roasting tin – don’t cram them into too small a tin otherwise the vegetables will steam rather than roast – and roast for approx half an hour in a hot oven – 220 degrees C in a domestic fan oven. The vegetables are ready when they are soft but not mushy and the top layer are toasted and golden brown with darker brown edges – don’t let them blacken and burn. Stir them about once or twice while they are roasting.
While the vegetables are roasting, soak the saffron threads in a little hot water (1-2 fl oz) in a measuring jug for 15 minutes or so. Top up the measuring jug to the three quarter pint level with vegetable stock.
When the vegetables are cooked, remove from the oven, tip in the drained beans and stir to mix. Remove approximately one quarter of the vegetable mix and liquidize or blend with the saffron stock liquid to make the sauce. Add up to a further quarter pint of vegetable stock if the liquidized sauce seems to thick. Tip the sauce back into the roasting tin and stir gently to mix, scraping any toasty brown bits from the base of the roasting tin as you do so, but being careful not to break up the roast vegetables too much.
To serve – warm through and garnish with chopped fresh coriander and offer extra harissa and chopped preserved lemons separately.
Good things from Borrowdale
November 10, 2011 § Leave a comment
Perhaps the only good thing about having the kitchen redecorated is that we’re forced to get out of the house. When a glistening fresh coat of extra-slow drying oil-based eggshell arrived on the cupboard doors on Friday afternoon, we were forced to spend a weekend away. Fortunately, it all fell into place as there was a weekend of glorious high-pressure weather forecast for the North of England (remarkable for the first week in November) and my favourite youth hostel, the remote but cosy one up on the Honister Pass in the Lake District, had a family room available. So we packed the car, upped sticks and were rewarded with the most fantastic autumn weekend in and around the Borrowdale valley.

Saturday was spent on a circular lower level walk which, in addition to uplifting views and vibrant autumn colours, took in 4 different tearooms at Grange-in-Borrowdale, Watendlath, Rosthwaite, then back to Grange for a visit to its other tea establishment. Definitely my kind of walk.

I took the opportunity to stock-up on local products including this fantastic comb honey available from the Grange tearooms. According to the label, it comes from S. Edmondson of Troutdale, just down the road. It’s a dark, clear honey – from heather perhaps? and spread on my breakfast toast this morning I can confirm that the taste is divine – deeply fragrant, not too strong, and, odd as it may sound, I love the chewy crunch of the little bits of honeycomb wax.

I’ve now done a little reading round about the etiquette of whether or not to eat the wax in honeycomb. The consensus amongst the beekeeping community seems to be to go for it and eat the lot, honey, wax and all, so I now feel vindicated. There are some more delicate folk out there who prefer to chew then discreetly spit out – each to his own I suppose.
The village of Rosthwaite is home to Yew Tree Farm and its Flock-In tearoom which with its practical slate floors and generously sized cakes and mugs of tea, offers a warm welcome to walkers.

They make their own Borrowdale teabread here and sell whole loaves to take away as well as buttered slices to accompany your tea. I love teabreads of all kinds – quickly made, wholesome, and because there’s generally not much if indeed any fat in the cake mix itself, you can feel justified in enjoying a slice spread with lots of lovely butter.
Borrowdale teabread is a dark, moist slightly spicy loaf cake. Its colour comes both from the tea-soaked dried fruit it contains and the soft brown sugar used in the mix. I had a chat with Mrs Relph of Yew Tree Farm who was behind the counter that afternoon about the origins of Borrowdale teabread. Her view was that the dried fruits, spices and indeed tea in this teabread are a legacy of the overseas trade from the nearby port of Whitehaven. She mentioned that her recipe is made without the addition of fat so that it needs to be well-wrapped and stored in an airtight tin if it’s not to dry out if kept for any length of time. Not much chance of that in our family…

I’ve researched Borrowdale teabread recipes and have come up with my own version which I give below which combines the best bits of each recipe. I think the addition of a little melted butter which several recipe authors suggest will improve the keeping qualities of the cake.
I was then reminded of a treasured recipe for Borrowdale biscuits which I assume must originate in this same Lake District valley. Here’s the recipe given to me by my schoolfriend Helen Wright’s grandmother absolutely ages ago and kept in a file ever since:

These are the most moreish pale gold crunchy biscuits – like a superior Hob Nob for those familiar with the McVities product range. Going back to Helen’s house after school we’d be offered some of these with a cup of tea. I’m not proud to say I’d help myself to 6 or so more than the polite 2 offered when I thought nobody was looking…
I’ve tinkered with the original recipe just a little, substituting butter for margarine as I avoid margarine if I possibly can on grounds of flavour and odd as it may sound, health – all those lovely fat-soluble vitamins in butter from grazing cows can’t be all bad.
Most of the measurements in the original recipe are in “small teacups” so I’ve done my best to standardise the measures to give a consistent result.
I can’t wait to get back into my kitchen to start cooking once again rather than relying on baking memories, but in the meantime, it’s good to be outdoors burning off those cake and biscuit calories.

Recipe for Borrowdale teabread
Adapted from various sources including a Lakeland contributor to the Farmer’s Guardian, Carole Gregory’s little booklet “Favourite Lakeland Recipes”, Sizergh Barn’s online recipe (unusable as published as riddled with errors) and eating carefully the of Flock-In tearoom’s own teabread. I’ve maintained the key ratios and ingredients of the recipe but have incorporated what I think are the best elements of each recipe.
Good spread thickly with salted butter and maybe a wedge of crumbly Lancashire cheese.
Makes one large loaf cake.
Ingredients
½ pint (225 ml) strong hot black tea
14 oz (400g) dried mixed fruit (to include sultanas, raisins and glacé cherries)
6 oz (170g) dark soft brown sugar (use light soft brown sugar for a paler teabread with a less pronounced molasses flavour if you prefer)
1 large egg, beaten
grated rind of 1/2 orange and 1/2 lemon
1 oz (25g) melted butter
7 oz (200g) plain flour
2oz (50g) wholemeal flour
3/4 teaspoon bicarbonate of soda
¼ teaspoon freshly grated nutmeg
½ teaspoon mixed spice
Mix together the dried fruit and sugar in a large mixing bowl. Pour over the hot tea, cover and leave overnight to steep.
The next day, prepare a 2lb loaf tin by greasing and lining the base with baking paper. Preheat the oven to 160 C (fan).
Add the beaten egg, melted butter, grated citrus rind and grated nutmeg to the bowl containing the soaked fruit and mix well.
Sieve together the flours, bicarbonate of soda and spices. Tip any bran from the wholemeal flour or any larger pieces of grated nutmeg which don’t make it through the sieve back into the bowl too. Add to the bowl and fold into the mixture to blend thoroughly.
Pour the mixture into the prepared tin and bake for about 1 hour until firm when pressed lightly, well-risen and a deep golden brown.
Cool in the tin for 30 minutes then turn out and cool on a wire rack. Store in an airtight tin. Best left overnight before eating to allow the flavours to develop and the bread to soften and become sticky.
Recipe for Borrowdale biscuits
Adapted from a recipe given to me by my schoolfriend Helen Wright’s grandmother.
Makes 50-60 biscuits
Ingredients
8 oz butter
8 oz golden caster sugar
2 dessertspoons golden syrup
6 oz rolled porridge oats
8 oz self raising flour
1 teaspoon bicarbonate of soda
2 tablespoons boiling water
Cream together the butter, sugar and syrup. Dissolve the bicarbonate of soda in the boiling water. Add to the mixture then add the dry ingredients.
Pinch off and roll between your palms small balls of the dough about the size of a heaped teaspoon and set a little way apart on a prepared baking tray.
Bake at 160 degrees C/325 F/gas 3 for approximately 15 minutes.
Contact details
Flock-In tearoom
Yew Tree Farm
Rosthwaite
Borrowdale
Cumbria
CA12 5XB
Tel 01768 777 675
Website www.borrowdaleherdwick.co.uk
Borrowdale honey – jar and whole honeycomb in box available from tearoom in Grange-in-Borrowdale
Details on honey label are:
S. Edmondson
Troutdale
Keswick
Cumbria
Salad from Sale
June 23, 2011 § Leave a comment
If you’ve ever been tempted by the mound of dainty salad leaves sold by weight in Chorlton’s legendary Unicorn grocers, you may have noticed not only that they beat supermarket sealed-bag salad leaves hands down for flavour and freshness but also that they are grown just down the road at Glebelands Road in Sale by an outfit called Glebelands City Growers.
Glebelands City Growers threw open their picket gates for last week’s Open Farm Sunday so I decided it was time for another visit to this idyllic little urban growing spot on the banks of the Mersey. Arriving via a very ordinary looking urban street, you turn down an alleyway between two semis and suddenly you arrive in the most unexpected haven of lush greenery.

Glebelands City Growers is not a faceless organisation but is Charlotte, Adam, Sally and Ed who collectively bear more than a passing resemblance to Velma, Shaggy, Daphne and Fred from Scooby Doo – no dogs in evidence last week though. The four of them have established a most happy blend of idealism combined with capitalism. They farm their small patch of Eden using organic methods and produce some of the products that we’re all clamouring for: unusual salad leaf mixtures complete with edible flowers if you’re lucky, coriander, basil, baby spinach, broad beans – the kind of stuff that finds its way into glossy food mag photo shoots at this time of year. So they’ve got the product range right on target and they succeed in making a profit but also follow sound ethical principles too – organic, sustainable, local, all with a healthy dash of pragmatism thrown in.

We were welcomed on our arrival by Adam with big mugs of tea or a glass of his home made elderflower cordial. The forecast rain arrived then, right on cue so we sheltered in one of the seed cultivation areas whilst people arrived ready for the first guided tour. We were in distinguished company – here’s Trafford Mayor Jane Baugh rubbing shoulders with the commoners in the high-tech potting shed:

When 30 or so visitors had arrived, the tour began. The team grow all their own plants from seed, unlike some growers who buy in seedlings to grow on. Polytunnels are used extensively to provide protection from the worst of the weather and play a part in keeping weeds and pests under control. Here’s Ed demonstrating the use of the hoe, the primary technique for keeping weeds under control:

Growing under cover provides protection from the wind and cold, but how are the plants watered if there’s no rain falling on them? The answer came as we entered the next polytunnel which housed a crop of fragrant basil. The plants are nurtured using efficient drip-hoses fed from collected rainwater where possible:

At the heart of an organic farming system is the idea of feeding the soil rather than the plant. This is achieved firstly by applying organic matter in the form of home made compost. The team has an arrangement with Unicorn whereby all the shop waste is composted down and applied to the soil. The second key feature is the use of a crop rotation plan whereby different plants are moved around the plot each year so pests and diseases never have chance to build up in the soil. After a period of trial and error, the team work to a five year rotation in which the land is left fallow in the fifth year. In the next picture you can see a fallow strip on the left and a crop of broad beans on the right, a legume performing its vital nitrogen fixing role as well as tasting good.

Finally, we learned about the harvesting of the leaves which takes place four times a week and is carried out by hand using a pair of scissors. The produce then travels some 3 miles to its primary retail outlet, Chorlton’s Unicorn Grocers (Chorlton is a suburb in South Manchester). It really is fresh and local.
Fortunately for us, there were a few bags of salad for sale on the day. I’m ashamed to say that once the tour was concluded, I raced to the trailer where the salad was for sale, shamelessly overtaking other visitors as I didn’t want to miss out. We were rewarded with a lunchtime salad to savour:

SO, if you can’t grow your own and live in the South Manchester area, get yourself down to Unicorn and try it for yourself. Just remember they’re not open on Mondays though.
Contact details
Unicorn Grocery
89 Albany Road
Chorlton
Manchester
M21 0BN
Tel: 0161 861 0010
Email: office@unicorn-grocery.co.uk
Web:http://www.unicorn-grocery.co.uk/
Glebelands City Growers
Email: contacts@glebelandscitygrowers.co.uk
Web: http://www.glebelandscitygrowers.co.uk/
Weird fish
June 11, 2011 § Leave a comment

The weird fish in question is a ling, a member of the cod family. Rick Stein writes about ling in his “Taste of the Sea” like this:
“Ling is one of those underrated fish which, in addition to being reasonably flavoured, is also firm in texture – a cheap version of monkfish, if you like. It is an extraordinary looking fish which could easily be mistaken for an eel, so long and sinuous is its appearance.”
He’s certainly right about how it looks as the picture above, snapped at Samantha K’s fish shack on the harbour at Southwold, shows.
Over the years we’ve gently fallen in to the routine established by my husband’s family of joining a large family party at Southwold on the Suffolk coast. We eat out some of the time but for the most part take turns to cook an evening meal served on the big kitchen table.
Last Thursday, it was my turn to cook so, being by the seaside, I decided to cook fish. One of the pleasures of a holiday in Southwold is wandering along the Blackshore Harbour waterfront to buy the freshest possible fish without guilt – it’s caught sustainably on lines by small day boats which supply the harbourside shacks in the most direct way possible.
You have a choice of 3 fish shacks to buy from. My favourite is the smallest and simplest of the lot, Samantha K’s:

The Sole Bay Fish Company, a pebble’s throw away is good too and clearly has a superior PR machine. Blimey, you can even find Jasper Conran extolling its virtues in a Guardian Online article…

Having looked at what was on offer, I couldn’t resist choosing the impressive and rather scary whole ling. All mine for £24. The fish guy kindly filleted the monster for me while Tim and I slipped off to the Harbour Tearooms for an early morning coffee and toasted teacake.
I chose a simple Indian-inspired recipe to show off the fish at its best – the fish fillets are briefly marinaded in lemon juice plus added aromatics, then coated in lots of chopped fresh herbs before being baked for 20 minutes in a hot oven.

I included wild fennel which I found growing wild on the beach in my fresh herb mix for a truly local flavour:

It’s a very adaptable recipe which would work well with all sorts of white fish and the half hour marinading period gives the cook a perfect excuse to slip off to the local pub for a sundowner.
Cooking with fish this fresh was a real revelation. The raw fillets on the board didn’t smell fishy at all, there was just the faintest seaweedy smell of the sea. The cooked fish flaked easily, was an amazing pearly white and the taste was clean, fresh and very summery. So yes, Rick, I agree with you about the fish being underrated and reasonably flavoured but beg to differ on its texture being similar to monkfish – it’s much closer to the flaky texture of cod. A cheaper version of monkfish really would have been too good to be true.
I served the fish with spiced basmati rice, an Indian style grated carrot salad, cucumber raita and some simply steamed greens. A shameless attempt to persuade some of the curry fans in our family to give fresh fish a try – it seems to have worked:

Recipe for fish baked with herbs
I’ve adapted this recipe from one given in Thane Prince’s “Summer Cook”, a slim paperback volume perfect for slipping into your bag if you’re heading off on a self-catering holiday. Her recipe is called Pudina Macchi and she attributes it to Indian chef Satish Arora. Pudina is the Hindi word for mint, a key ingredient in this summery, fresh tasting and straightforward dish.
Serves 4
Ingredients
4 square chunky pieces of white fish fillet, one per person, each weighing about 6 oz so approx one and a half pounds in total. I left the skin on to help the fish keep its shape. I used ling but cod, haddock or any similar variety would work fine in this adaptable recipe
2 cloves garlic, peeled and roughly chopped
1 teaspoon ground coriander
1 fresh red medium hot chilli deseeded and roughly chopped (adjust quantity of chilli to suit your group’s capacity for heat)
juice of 1 lemon
small bunch each of mint, coriander and an aniseedy herb such as fennel or dill
2 tablespoons light olive oil
In a shallow glazed ceramic dish which which will hold the fish fillets snugly without overlapping to much mix together the garlic, coriander, chilli and lemon juice to form a marinade. Place the fish in the marinade flesh side down, skin side up, cover with cling film, refrigerate and leave in the marinade for betweeh 30 minutes and 1 hour. Don’t leave it longer than this as the lemon juice “cooks” the fish and you’ll end up with a ceviche on your hands rather than fish ready for cooking.
Meanwhile, prepare the herbs. Remove the leaves from the mint stalks and chop roughly. The coriander and fennel/dill can be chopped just as they are as their stems are tender. Mix together the chopped herbs.
Once the marinading period is over, remove the fish from the marinade and discard the liquid. Press the flesh side of the fish into the herb mixture aiming for a really thick generous herb coating. Place the fish skin side down, herb side up in a shallow baking dish.
Drizzle the light olive oil over the fish and bake in a preheated oven at 200 degrees C for approximately 20 minutes. Test the fish for doneness as it approaches the end of its cooking time by pressing with the point of sharp knife feeling for the difference in resistance between just cooked and slightly underdone fish.
Fenella’s cheese is Delicious
May 31, 2011 § Leave a comment
Browsing May’s issue of Delicious magazine on a train journey recently I was thrilled to see Fenella Madison’s cheese featured in Debra Waters’ article on the food of Guernsey (p106 in the June issue).
Fenella makes a gorgeously creamy soft blue cheese from real Guernsey milk (ie milk from the island and not just from the Guernsey breed of cows) which she has named Fort Grey after a local landmark visible from her home in the picturesque south of the island.
Sadly, you can only buy Fenella’s cheese on Guernsey. Because the Channel Islands are by a quirk of legislation outside the European Union, the cost and red tape renders exporting the cheese to the UK out of the question.
This didn’t stop me organising a possibly illegal personal export of my own after last summer’s holiday. Here’s the tasty canapé style snack I made on my return home. It combines Fenella’s cheese with a little raw cured ham on a piece of Italian carta da musica bread.

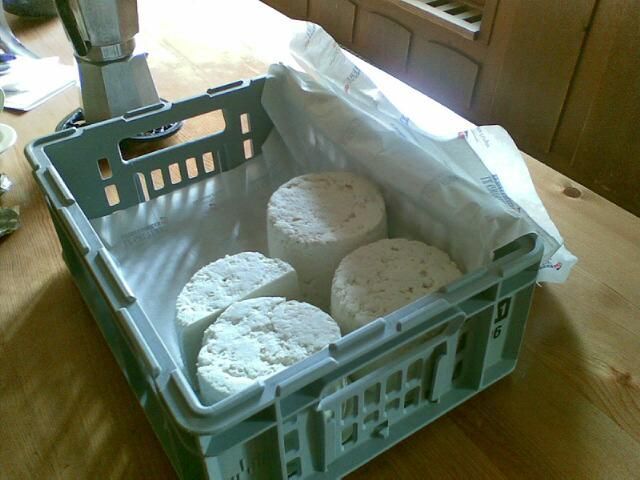
As the article mentions, Fenella makes the cheese in a converted garage attached to the family home. She began cheese making relatively recently after taking a course at the School of Artisan food in Nottinghamshire under the tutelage of Randolph Hodgson of Neal’s Yard Dairy no less. We called in on Fenella and husband Derek on what should have been the last day of our summer holiday last year and were lucky enough to have a personal guided tour of the cheese making facility.
Here’s the fridge where the maturing cheeses are stored. As you can see, this is a genuinely hand made cheese produced in small batches.

Fenella is scrupulous about temperature control, cleanliness and all aspects of hygiene. Here is elder son George modelling the obligatory net cap (and yes that’s Fenella in the background).

If you do happen to be visiting the island you can buy Fenella’s cheese at the Saturday Farmer’s Market at Saumarez Manor:

Or try it on the menu at The Auberge (Jerbourg Rd 01481 238485) or buy it at Forest Stores just near the airport (Le Bourg 01481 238485).
The green asparagus and the white
May 9, 2011 § Leave a comment
Yes, you guessed it – curiosity piqued by the current BBC adaption of “The Crimson Petal and the White” I’ve finally got round to reading Michel Faber’s racy historical novel . It made a perfect holiday read over Easter in France, punctuating the main activities of exploring the Forêt de Fontainebleau and thinking about the next meal.
I was reminded of the febrile atmosphere of the novel whilst strolling past a curiously mounded asparagus bed on the outskirts of the village where we were staying:

The French prefer their asparagus white with the tips displaying just a tinge of purple. This is achieved by banking the soil up around each asparagus crown to blanch the growing shoots. Pausing beside the weird dusty anthills concealing the exclusively male crowns beneath, you can practically hear the shoots growing as they thrust upwards towards the source of warmth and light. I felt positively faint after a few minutes gazing at these shoots in the lazy afternoon sunshine.

The Germans too prefer the thicky juicy spears of white asparagus (Spargel in German). Despite their buttoned-up reputation, they go a little bit crazy during asparagus season (“Spargelzeit”) when asparagus festivals and special restaurant menus abound. The thick juicy white spears are simply served either on their own or with boiled potatoes and ham and always with generous pools of yellow buttery hollandaise sauce.
Whilst in Dusseldorf during Spargelzeit I was intrigued to find an asparagus ice cream sundae on the menu. This turned out to be a spectacular trompe l’oeil affair of piped vanilla and palest pistachio ice cream (to imitate the spears) topped with chilled vanilla sauce to mimic the hollandaise. Only in Germany…
We Brits prefer the arguably better flavoured and certainly more decorous green asparagus. No stonking purple-tipped white shoots the width of a baby’s arm here thank you! There is the added plus point for the lazy cook that tender shoots of green asparagus don’t require peeling unlike their continental cousins.
So what does a field of English green asparagus look like? I’d fondly imagined rows upon rows of waving green fronds but in fact the banked-up rows of dry soil I spotted in Suffolk don’t look radically different from their French counterparts:

I took this photo in the sandy fields near the coast around Wrentham. These spears were destined for the packing sheds of Sea Breeze Asparagus http://www.seabreezeasparagus.co.uk/ who supply by mail order all over the country and have come up with the delightful idea of sending an edible bouquet of perfect top grade asparagus spears to your loved one. It’s got to be better than a tired bunch of petrol station flowers hasn’t it?
So, what to do if you find yourself with a bunch of either the green asparagus or the white and feel inclined to do a little more with it than the usual steaming and serving with melted butter?
Having trawled through my collection of recipe books and notes, here are a couple of recipes that appeal to me, the first suitable for green asparagus and the second for white.
Recipe for grilled asparagus with blood oranges and tapenade toast
Serves 4
From Alice Waters’ inspirational and beautifully illustrated book “Chez Panisse Vegetables”. This is her typically relaxed Californian take on a classic combination of asparagus and oranges. Classical French cuisine does this by primly serving steamed asparagus presented in white napkin with the orange flavoured hollandaise known as Sauce Maltaise. All very well but a tad formal. In contrast, just reading Alice Waters’ recipe transports you to Californian wine country and the perfect al fresco supper…
Ingredients
For the tapenade
2 cups niçoise (black) olives, pitted
4 salt-packed anchovy fillets
1 clove garlic
salt
2 tablespoons capers
2 teaspoons lemon juice
1/3 cup extra-virgin olive oil
For the rest of the dish
1 shallot
3 blood oranges
1 and 1/2 teaspoons balsamic vinegar
1/2 teaspoon red wine vinegar
extra-virgin olive oil
salt and pepper
1 and 1/2 pounds fat (green) asparagus – 25 to 30 spears
4 slices country-style bread
First make the tapenade. Peel and smash the garlic with a pinch of salt. Using a food processor, pulse together the olive. anchovies, garlic and capers to make a coarse paste. Add the lemon juice and then gradually the olive oil, pulsing until completely incorporated. Put into a small bowl and set aside.
Peel and chop the shallot finely and macerate for 30 minutes in the juice of half an orange and the balsamic and red wine vinegars. Whisk in the olive oil to make a vinaigrette, and season with salt and pepper.
Peel just the zest from one of the oranges, chop it very fine and add to the vinaigrette. Cut away all the rind and pith from 2 and a half oranges (one half was used earlier for juicing) and slice them crosswise thinly into rounds.
Parboil and drain the asparagus. Brush lightly with olive oil, salt lightly and grill the asparagus ideally over charcoal or a wood fire for about 6 minutes over medium heat, turning often. At the same time, grill the bread.
When the bread is toasted, cut the slices into thirds and spread with tapenade. Arrange the asparagus on a platter with the orange slices on top. Drizzle the vinaigrette over and garnish with the tapenade toast.
Recipe for white asparagus and new potato salad with mustard and walnut vinaigrette
Serves 8 as a side dish
An idea I came up with whilst in France this easter. A good way of stretching a single bunch of asparagus into a dish to feed more than one or two people. The combination of white on white looks good, the chives add both colour and delicate onion flavour. The walnut oil imparts a delicious flavour to the salad without overpowering either the asparagus or the new potatoes. Reading the list of ingredients, I’m transported away from my computer screen in grey and cloudy Manchester to a sunny lunch table in France once more.
Ingredients
1 bunch white asparagus (500g)
650g small new potatoes
small bunch chives
For the dressing
3 tablespoons light olive oil
3 tablespoons walnut or hazelnut oil
1 tablespoon white balsamic vinegar or white wine vinegar plus a teaspoon of sugar
1 tablespoon Dijon mustard
squeeze of lemon juice to taste
salt and freshly ground black pepper.
Wash, peel and trim the white asparagus. Steam for 10-15 minutes until soft but not mushy. Leave to cool, then slice each spear on the bias into 3 or 4 pieces. Set aside.
Prepare the dressing by whisking together all the ingredients. Taste and check for flavour and seasoning.
Scrub the new potatoes (no need to peel) and steam for 10 minutes or until cooked through (test with the point of a knife).
As soon as the potatoes are cool enough to handle, slice into chunks and tip into a bowl. Pour three quarters of the dressing over and stir. Leave for 5-10 minutes to allow the warm potatoes to absorb the dressing.
Add the reserved pieces of asparagus, the remaining dressing and a generous quantity of snipped chives to the bowl and stir carefully to distribute.
Transfer to a serving dish lined with little gem or baby cos lettuce leaves.
Contact details for Seabreeze Asparagus
Alison Cooper
Priory Road Site
Priory Road
Wrentham Beccles
NR34 7LR
Phone number 01502675330
E-mail address alison@wveg.co.uk
http://www.seabreezeasparagus.co.uk
Swiss Cheese
August 19, 2010 § 1 Comment
Swiss cheese is much in evidence at the show dairy in the hamlet of Pringy on the outskirts of the village of Gruyères in Western Switzerland. And I don’t just mean the vast wheels of the stuff in the maturing cellars. There’s lots in evidence in the twee on-site restaurant and most of all in the knick-knack laden gift shop.
Picture-perfect Gruyères with its castle, quaint winding streets and Maison de Gruyère show-dairy is definitely a tourist magnet. On the day of our visit it was overrun with visitors of all nationalities including two improbably grown-up and portly troupes of boy scouts. We duly joined the queue for tour and museum tickets and after a short wait we were taken step by step through the story of the cheese. It all starts here with the alpine pasture:
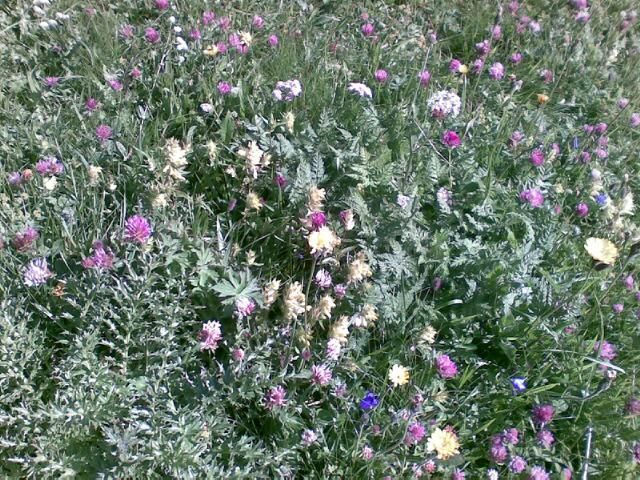
Well it does and it doesn’t as only the specially designated Gruyère d’Alpage is made in the summer from the milk of cows grazing the high mountain pastures. Just 56 dairies produce 400 tonnes per annum of this rare commodity whereas a total of 200 dairies produce 27,500 tonnes per annum of Swiss AOC (Appellation d’Origine) gruyère. Talking of AOC gruyère, the museum maintains a dignified silence on the subject of so-called French gruyère. The French cheekily awarded their own product national AOC status back in 2001 and subsequently went a step too far going for Europe wide PDO (protected designation of origin) status. Earlier this month the European authorities, quite correctly in my view, threw out the French claim. It’s a bit rich the French trying to protect their own so called gruyère cheese when they come down like a ton of bricks on smalltime producers of elderflower champagne…
Back to the genuine article. Swiss AOC gruyère can only be produced in a relatively small area centred around Gruyères itself within the cantons of Fribourg, Vaud, Neuchâtel and Bern. The milk comes not from what I think of as a traditional Swiss light brown cow but from the black and white or reddish-brown and white Fribourg breed. Each cow eats an astonishing 100kg of grass per day and produces as a result just 25 litres of milk. The traditional 35kg round of cheese is made from a generous 400 litres of milk. At the show dairy, they work with vats holding 4,800 litres of milk to produce 12 cheeses at a time. The morning milk is added to the previous evening’s milk (which has been stored overnight at a temperature of between 15 and 18 degrees C) before the cheesemaking process begins.
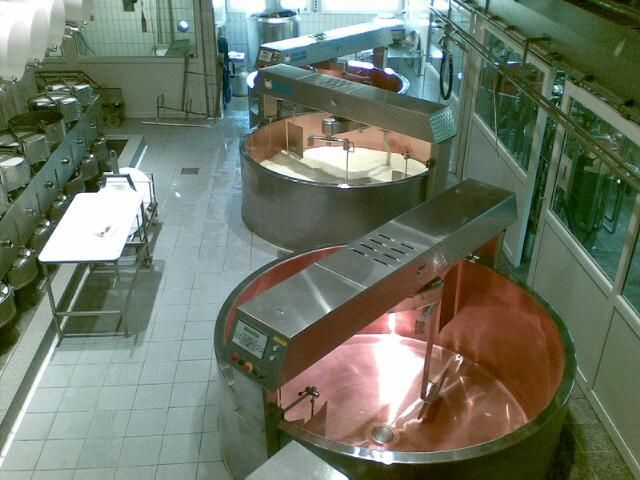
Gruyère cheese is often described as unpasteurised, but as the museum visit makes clear, the milk is gently heat-treated (to 57 degrees C compared to the 71 degrees C of the pasteurisation process) during the production of the cheese. The milk (presumably skimmed to remove the luscious Gruyère crème double much fêted in this part of Switzerland) is first heated to 32 degrees C before adding a natural starter culture (lactic acid fermentation agent in whey) and subsequently animal rennet. The starter culture matures the milk and the rennet causes it to coagulate into a mass. The coagulated milk or curd is then cut using large blades into small pieces. Judging the exact moment to begin the cutting is reckoned to be the trickiest part of the whole process.
The cut curds are then heated to 57 degrees C until the mixture becomes elastic and firm to the touch and the cut curds shrink to the size of small peas. At this point the whey is drained off and the curds ladled into moulds and pressed to form the virgin gruyère cheeses.

The fresh cheeses, vulnerably pliable at this stage, are soaked in a 20% brine solution which gives the cheese half of its ultimate salt content. Finally, the cheeses are placed on shelves of untreated pine (picea abies, the Norway spruce aka the Christmas tree) and left for a lengthy maturation process at a constant temperature of 13 to 14 degrees C. The cheeses are turned daily and brushed with salt solution as they mature. This no doubt used to be carried out by hand but the ever-ingenious Swiss have devised a robot to carry out this repetitive task. There is a certain fascination to be had watching the robot progress up and down the aisles of cheese.
5 to 6 months’ maturation produces a doux (mild) cheese; 7 to 8 months’ a mi-salé; 9 to 10 months’ a salé; +10 months’ a réserve; and finally 15 months’ a vieux. Older is not necessarily better in my book and I rather enjoyed the mild flavour of the youngest gruyère. Visiting the show dairy is a multi-sensory experience and helpfully you are given samples of 3 different ages of cheese to taste the difference. They become progressively more intense and savoury as they age.
You’re not normal if at this stage you haven’t developed an intense salivating urge to buy more cheese to take home. Might I suggest that you restrain yourself from joining the horrendous crush in the end-of-tour store and take a stroll up a grassy hill in the direction of the town of Gruyères itself. On the way, you will pass this traditional farmhouse:
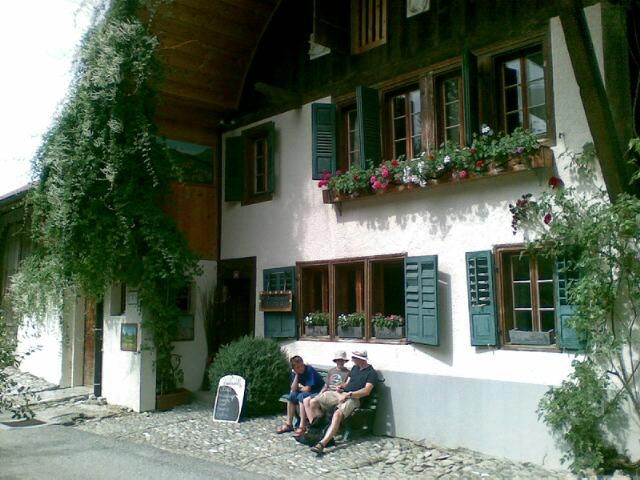
Ring the bell and the farmer’s wife will cut for you a wedge of authentic Gruyère d’Alpage. She also sells the fresh whey cheese known as sérac, a by-product of the gruyère cheese making process. This is what the local farmers used to eat themselves as the gruyère itself was far too lucrative a commodity for home consumption.
I initially thought that sérac must be a marketing man’s invention to make a plain cheese more enticing with a mountain-themed brand identity. A sérac is, as any mountaineer will tell you, the name of the rough ice lumps that form when a glacier undulates. It transpires that it’s the other way round. The cheese was named sérac first, with a possible derivation from the Latin word for whey, serum, and the glacial formation was named after the cheese in a fit of whimsy.
The farmer’s wife suggested eating the sérac as it came with salt, pepper and fresh herbs or using it as a cooking ingredient. I found a handy recipe for cooked sérac posted on the www.genevalunch.com website on 15 March 2010 by Jonell Galloway.
Finally, if all this sounds too touristy for you, how about a day’s foraging for wild plants in the lush Fribourg countryside? I saw an enticing little flyer for just such an adventure pinned up on the Maison de Gruyère noticeboard but didn’t have the time to take up the opportunity. The lady leading the foraging walks is Christine Brinkerhoff-Meier tel 00 41 (0)26 928 1429 ortieenfolie@hotmail.com. The tours run from 9.00 till 16.00 on Wednesdays, Saturdays and Sundays during the summer months.
Why don’t women drink beer?
July 13, 2010 § Leave a comment
I will certainly be drinking more beer after my recent Adnams of Southwold brewery tour. After all, what could be more refreshing than a pint of bitter on a warm summer’s evening? This particular beauty was pulled at the Red Lion on South Green in Southwold, Suffolk:

My fellow guests on the brewery tour were exclusively male and sadly mostly fitted the real ale stereotype of bellies, beards and sandals. It doesn’t need to be this way as, happily, our guide for the tour was master brewer Belinda, a no-nonsense microbiology graduate who seemed to have found her perfect niche in life. In a little over an hour, she gently demystified the brewing process throwing in a dashes of chemistry, history and folklore for good measure.
We started with the simple list of ingredients for making beer – malted barley, hops, water and yeast.
Barley first. Appropriately, the most commonly used variety is named “Tipple”. The degree to which the barley is roasted is key to the character of the finished beer – think of how different roast beans produce differently flavoured coffee. Here are some different samples of barley with different degrees of roasting:

My favourite for munching on (we were encouraged throughout to smell, taste and of course drink) was the enticingly named crystal malt (so called because the processing of the barley results in a glassy crystallised finish to the grain or endosperm as the experts call it). Crystal malt contributes biscuity, caramel flavours to the finished beer.
On to the hops. This was the part of the brewing process I particularly wanted to understand. I can’t count the times I have heard someone sniff their freshly pulled pint of beer and enthuse over its hoppy characteristics when all I could distinguish was a general beery smell. What would a hop smell like in isolation?
Belinda tipped a generous heap of dried hops onto a napkin on the table and invited us to smell them. I was first in the queue, almost sticking my nose into the heap, inhaling deeply. I smelt…absolutely nothing!

Belinda explained that the hop’s aroma is concentrated in the resin which is concentrated in the base of the dried flower in areas which have a brighter yellow colour. Rub these between your finger and thumb and the aroma is released…aah yes it worked. What I smelt was something a little floral, aromatic, even just a little acrid. A bit like the crushed leaves of pineapple mayweed or even camomile flowers. So this was the characteristic hop aroma I’d wondered about all these years.
I did some homework after the tour. Harold McGee’s amazing food science book “On Food and Cooking” (Heston Blumenthal’s bible) didn’t let me down when it came to hops. He explains that hops (Latin name Humulus lupulus) provide 2 different flavour elements in beer: bitterness from phenolic alpha acids (humulone and lupulone) in its resins and aroma from its essential oils. The aroma of ordinary hops is dominated by the terpene myrcene also found in bayleaf and verbena whereas other more exotic hop varieties are dominated by the more delicate humulene, also other terpenes such as pinene, limonene and citral which give piny and citrus aromas to the hops.
There’s a balance to be struck with hops – the bitterness only comes out after prolonged heating of the brew which of course destroys the aroma. To give the finished beer more aroma, a practice known as dry-hopping is used which means that hop pellets (they are most conveniently used in this form) are thrown into the brew after it has been boiled and they slowly infuse their flavours and aromas at a lower temperature. So beer has a lot in common with herb teas and tisanes and you can’t get much more ladylike than that!
Now for the yeast. This is perhaps the most mysterious of the ingredients. At Adnams they use their own special natural yeast strain which has been kept alive for years. It’s not the same as regular baking yeast but has in fact been used successfully for breadmaking by a Lowestoft baker in the past.
Finally the water, the simplest of the ingredients. Adnams now use the town supply carbon-filtered to remove unwanted chlorine rather than, as previously, water from their own well. Calcium chloride is added to the water to act as a catalyst for the various necessary enzyme processes.
In overview, the process for making beer is relatively straightforward: after all it used to be produced in the home as women’s work in the mediaeval period. It can be divided into 4 stages:
1. Preparing the wort. A mash is made with water and malt which is soaked for 1 and 1/2 hours then heated for 3 hours to produce a sweet coloured liquid which is drawn of ready for stage 2.
2. Boiling the wort – hops are added and the liquid is boiled both to add bitterness from the hops and to inactivate the malt enzymes and so fix the sugar and carbohydrate levels in the mix. The liquid is drawn off and sent to the fermentation tank ready for stage 3.

3. Fermentation. Yeast is added and the mixture is kept at a controlled temperature for fermentation to occur over a period of 2-10 days. During this period the yeast converts the sugar into alcohol and its byproduct carbon dioxide which gives the beer its fizz. Top fermentation is carried out at a higher temperature (up to 25 degrees C) and gives the beer a strong acidic flavour with fruity spicy notes. Fermentation at lower temperatures produces beer with a drier, crisper flavour and bready notes.

4. Clarification and conditioning
The yeast foam and from fermentation and dead yeast cells are removed by a combination of filtration and fining (adding an agent that attracts and collects the detritus in the beer making it easy to remove the whole lot in a lump. Intriguingly, isinglass, a gelatine like substance derived from fish swim bladders (originally sturgeon) is still used by Adnams as the preferred fining agent. Technically then vegetarians can’t drink beer. With a degree of pragmatism overcoming principle, it seems that the beers can still be deemed suitable for vegetarians as the fish derived content of the beer is so small.
The beer is then transferred to cask or bottle and the bottled beers are pasteurised to increase the shelf life. Secondary fermentation occurs in the cask so it is a living thing with a shelf life of just a few weeks hence the importance of a publican who knows how to keep his beer properly.
So, 4 ingredients, 4 processes – sounds simple but 8 building blocks can give you a seemingly infinite variety of outcomes. Think of music built on 8 notes of the scale or DNA built from just 4 bases…
Going back to my opening question, why don’t women drink beer, I think much of it is in the marketing. Scanning the list of names they give a distinctly masculine old fashioned wartime image (Bombardier, Spitfire, Barnstormer…) or else give an impression of a warm cloudy brew fit only for yokels (Tanglefoot, Waggle Dance, Grumpling). There are so many different beer styles out there that there must be something for everyone. If we could cut the old fart marketing and come up with something cleaner, simpler and more explanatory I think the breweries could be on to a winner in terms of opening up a whole new market beyond the CAMRA afficionados.
And yes, the tour did conclude with a comprehensive tasting of the Adnams range – drink all you like within reason!
A dish for spring: potato pie with Beaufort cheese
March 27, 2010 § Leave a comment
The best thing about the Tarentaise town of Moutiers in the French alps is that it is home to a co-operative which produces the magnificent Beaufort cheese. I passed through Moutiers last weekend on the way home from my ski tour and brought home a generous wedge of the stuff.
You may know Moutiers as the road bottleneck en route to your ski holiday or indeed as a vast alpine waiting room: at weekends the coaches lumber through from the early hours of the morning and the place is thronged with dishevelled looking bleary-eyed travellers. However last weekend, Moutiers was looking uncharacteristically lovely in the spring sunshine:

Just around the corner from the bridge over the Isère river is the redoubtable co-operative building. Solid and pink, you really can’t miss it:

And, joy of joys, there is a wonderful shop within which keeps sensible opening hours (open till 6.30 in the evening). Of course the Beaufort d’ été (cheese made from summer milk when the cows have grazed on the high alpine pastures) takes pride of place:

As well as the Beaufort, the shop sells a fantastic range of other local cheeses, sausages and preserves. I could have filled my shopping basket many times over but, mindful of my budget airline’s baggage weight limit and my own ability to lug the stuff home along with my ski kit, I confined myself to a single perfect generously proportioned wax paper wrapped parcel.
The co-operative offers guided tours at weekends. Sadly I didn’t have time for one of these but there are plenty of information leaflets on hand.
Time for a few Beaufort facts:
• Beaufort is produced under the EU’s “Appellation d’Origine Protégée” scheme
• Its production is limited to the Beaufortain, Tarentaise, Maurienne valleys plus part of the Val d’Arly all in the département (administrative region) of Savoie in France.
• The milk used to make the cheese must come from two special mountain cow breeds, the Tarine and the Abondance.
• There are currently 650 milk suppliers, and 45 cheesemakers collectively producing some 4,300 tonnes of cheese a year.
And one kilogramme of this lovely stuff was mine all mine to to take home and treasure! In the unlikely event that you should tire of eating your Beaufort au naturel, here is a recipe which both showcases the cheese and doesn’t require too much of it.
It comes from Simon Hopkinson’s new book “The Vegetarian Option” and combines the cheese with potatoes and cream, encasing the lot in buttery puff pastry. A scattering of fresh herbs – thyme and the first chives from the garden – give a taste of spring.
Here’s the cheese and potato filling spread onto the puff pastry base:

And here is the finished pie glazed and ready for the oven:

And here is the crispy golden brown finished article smelling deliciously of thyme, a touch of garlic and cheese.

Recipe for potato pie with Beaufort cheese
Taken from Simon Hopkinson’s “The Vegetarian Option” but with some alterations/improvements of my own. This is absolutely gorgeous eaten warm from the oven with a simply dressed peppery green salad. It’s also pretty good cold the next day perhaps as part of a superior packed lunch if by chance there’s a wedge left.
Ingredients
500g small/medium potatoes (SH suggests Desirée: I used new season Pentland Dells very successfully – they have just the right balance between flouriness and waxiness for this dish)
Salt, freshly ground black pepper, freshly grated nutmeg
100 ml double cream
2 garlic cloves, peeled and lightly bruised
10-15g butter for dotting
375g bought all-butter puff pastry in 2 equal pieces or sheets (if you have a 500g pack pastry, simply scale up the recipe)
75g Beaufort cheese, very thinly sliced
teaspoon each chopped thyme leaves and snipped chives
beaten egg to glaze the pastry
First steam or boil the potatoes in their skins until tender. Leave to cool, peel and slice thickly and put to one side.
Place the cream with the garlic in a small saucepan, bring to the boil then remove from the heat, cover and allow to infuse until the cream is cool.
Line a shallow heavy baking sheet with baking paper. Roll out the pastry into a rough square shape 2-3mm thick. Take as much care as you can as this will be the shape of your finished pie. Lay the pastry on the baking sheet.
Leaving a border of 2 cm or soCover the pastry shape with half of the potatoes, overlapping slightly. Lightly season with salt, pepper and nutmeg and cover with half the cheese, half the herbs and a few dots of butter.
Repeat these layers. Brush the border of the pastry with beaten egg. Roll out the second piece of pastry to an identical shape and place over the following. Press the edges very firmly together, rolling up to form a tight seal. Remember that you will be adding liquid cream to the filling shortly and it is imperative that it does not leak out. Press the tines of a fork into the rolled rim of your pie to further reinforce the join.
Carefully cut a hole 1 cm in diameter in the centre of the pie. This will allow you to pour cream into the pie in due course. Glaze the finished pie generously with beaten egg.
Before adding the cream and baking the pie it is a good idea to rest the whole thing in the fridge for half an hour to stop the pastry shrinking when it goes into a hot oven.
Preheat the oven to 220 degrees C/gas mark 6 while the pie rests.
Once the pie is rested and you are ready to bake it, the final step is to add the cream. Remove the garlic from the cream then carefully pour cream through the hole into the pie either using a funnel or a teaspoon. Allow the cream to settle and stop pouring as soon as the pie seems full. Reserve and set aside any leftover cream, you will have a chance to add some more once the pie has browned.
Place the pie in the oven and bake for 220 degrees C/gas mark 6 for 20 minutes until the pastry begins to crisp up and become golden. Remove from the oven and add a little more of any remaining cream.
Reduce the heat to 180 degrees/gas mark 4, return the pie to the oven and continue cooking for a further 20-25 minutes until puffed and golden brown all over. Check progress during this second phase of baking and cover with foil of necessary to stop the pastry turning too brown.
Let the pie stand for a few minutes after baking. If you are not eating it straightaway, remove carefully to a wire rack to allow to cool.
