
Lemon meringue pie
June 2, 2013 § Leave a comment
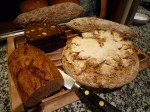
What a delicious thing a carefully made lemon meringue pie can be. With its combination of crisp shortcrust pastry, sharp lemony filling and pillowy meringue it proves a worthy rival to a French tarte au citron.
For the past 11 months I’ve been helping out one day a week at a café staffed by learning-disabled students from local charity Stockdales. My speciality slot has become “dessert of the day” and at the conclusion of lunchtime service we decide on what next week’s “dessert of the day” will be.
During winter and early spring We’ve run through the gamut of crumbles, steamed and baked puddings, pies and tarts until finally, as spring turned towards summer the challenge of lemon meringue pie came up.
What could be simpler, I thought. After all, this was a dessert my mother used to whip up back in the 1970s. How wrong I was! It’s one of the most technically challenging things I’ve been asked to cook recently and, what with broken blind-baked bases, a filling that didn’t set and weepy meringue it took 3 attempts to perfect.
What are the secrets to success?
1) A sturdy blind-baked pastry case without cracks.
2) Carefully measured filling ingredients with the ratio of liquid to cornflour strictly observed. It’s a good idea to let the filling cool completely before topping with meringue and baking.
3) Italian meringue prepared in advance gives a reliable, stable meringue to work with.
Here’s star student Elaine piping the Italian meringue in place. It’s the first time she’s done any piping work and as you can see, she’s a natural!

Recipe for Lemon Meringue Pie
My own recipe compiled by scouring recipe books for different versions and choosing the best of each. Serves 6.
8 inch flan ring
Ingredients
Shortcrust pastry made with 180g plain flour, 90g fat (I like to use half butter and half lard) and sufficient cold water to bind
For the lemon filling
200ml lemon juice
100ml orange juice or water
175g caster sugar
30g cornflour
3 egg yolks
30g unsalted butter
For the Italian meringue
3 egg whites 30g each
180g granulated sugar (double the weight of the egg white)
70g water (1 and ½ tablespoons ie 22.5g per egg white)
Bake the pastry blind for 25 minutes at 180 degrees C fan, remove the beans and foil, reduce the oven temperature to 170 degrees C (fan)then bake for a further 15-20 minutes until an even biscuit colour and thoroughly cooked through.
Slake the cornflour with a little of the orange juice taken from the measured quantity. Put the lemon juice and rest of the orange juice, sugar, yolks in a saucepan, add the slaked cornflour and whisk until smooth. Heat over a moderate flame, whisking and stirring frequently and when the mixture becomes warm, add the unsalted butter and bring to the boil, stirring often. Allow to bubble whilst stirring for a good 30 seconds or so. Spoon the filling into the tart case (there should be a gap at the top of 1/2 cm or so) then leave to cool until completely cold.
Meanwhile make the Italian meringue. Heat the sugar and water in a small saucepan to form a syrup. Heat to 118-120 degrees C. Whilst the syrup is boiling, whisk the egg whites in a medium grease-free bowl until stiff.
Pour the boiling syrup over the egg whites at the same time as whisking with a hand held electric whisk. Keep whisking until ther meringue is cool.
Fill a piping bag with the meringue and pipe as much as required onto the cooled pie filling. Start at the outside edge and pipe partly onto the pastry to anchor. You may not need all the meringue.
Bake at 150 degrees C (fan) for a 20-25 minutes. I find it best to bake rather than blowtorch the meringue to make sure the meringue is fully cooked to a safe temperature. Also it catches fire when blowtorched leaving unattractive little black wicks on the piped meringue peaks!
Canadian breakfast
May 4, 2013 § Leave a comment
The latest in our Breakfasts of the World Project series.
We cheated ever so slightly on this one, eating it out of synch with the rest of the series to coincide with visiting family and friends the morning after a certain Big Birthday late last year (my husband Tim’s not mine I hasten to add).
Here are various family members and friends tucking into classic breakfast pancakes, back bacon and, of course, lashings of maple syrup.


We can buy maple syrup pretty readily here in the UK – you can see in the picture below two different grades of syrup – No 1 and No 2 Amber (I’ve not yet found the elusive Grade 3 Dark syrup on supermarket shelves here). It was also time to bring out the prized bottle of rare Nova Scotia maple syrup, a gift from cousin Paul and family who live in Halifax, Nova Scotia.

I delved briefly into the details of maple syrup production and it seems that the Canadian province of Québec is responsible for some 75% of the world’s output of maple syrup. Anything calling itself Canadian maple syrup must be made exclusively from the concentrated sap of predominantly three types of maple tree – the sugar, red and black maples. It can take up to 50 litres of raw sap to be boiled down and concentrated into 1 litre of syrup.
Also on the menu were muffins (English muffins though we call them just muffins in England much as Canadian bacon is known as such anywhere but Canada) and delicious wild Pacific smoked salmon. If I’d felt more perky that morning, I might have conjured this into a Vancouver-style take on Eggs Benedict but we had to make do with just cream cheese on our muffins to accompany the salmon.
There are lots of fascinating Canadian breakfast dishes I could have tried – fellow breakfast blogger Shawna has alerted me to cretons, a Québecquois take on French rillettes (small pieces of pork and onion gently cooked in the fat rendered from the meat to form a pâté-like mixture)served on toast as part of a traditional breakfast.
Browsing through my recipe book “Out of Old Nova Scotia Kitchens” by Marie Nightingale, I see we’ve missed out too on the “Old-Fashioned Lunenburg Breakfast or Supper Dish” of cooked apples and onions baked with onions and cream. Then there’s my Blomidon Inn bread recipe from Wolfville, Nova Scotia for a loaf flavoured with oats, cornmeal and molasses…I’ll have to return to Canadian breakfasts some time soon.
Recipe for breakfast pancakes
These are a perennial favourite at home and the recipe comes from my trusty and ancient Good Housekeeping Cookery Book where these pancakes are referred to as Scotch Pancakes or Drop Scones.
Makes 10-12 small pancakes.
Ingredients
100g plain flour
2 teaspoons baking powder
30g golden caster sugar (about 2 tablespoons)
1 egg, lightly beaten with a fork
Milk to mix – about 150ml
1 teaspoon vanilla extract or ground cinnamon (optional)
Mix together the flour, sugar and baking powder in a medium mixing bowl. Make a well in the centre and pour in the egg and a little of the milk. Stir with a balloon whisk, bringing in the flour from the edges of the well and gradually adding more milk as you do so. When the batter reaches the consistency of thick custard. Beat with the whisk for 10-20 seconds until any remaining lumps have gone. Whisk in some more milk until you have a thickish smooth batter the consistency of extra-thick single cream that will drop from a spoon. Whisk in the vanilla extract or ground cinnamon if using.
Drop the mixture in large spoonfuls (I use a small ladle) onto a hot lightly greased non-stick frying pan. Keep the pan at a steady heat and when bubbles start to rise to the surface of the pancakes (after about 2 minutes, maybe earlier), flip them over using a small crank-handled palette knife and cook for a minute or so on the other side until golden brown and cooked through. Store in a folded clean linen teatowel as you make them to keep them warm and soft.
Serve with maple syrup and bacon or butter and jam. They’re pretty good cold with butter and jam if ever you find you have some left over.
Tardivo radicchio
April 17, 2013 § Leave a comment
I wrote about Castelfranco radicchio last year after saying I’d becoming obsessed with trying every radicchio variety I could lay my hands on. It’s high time I returned to radicchio, originating from the Veneto region of Italy, and this time it’s the turn of the striking radicchio Tardivo. As I’ve mentioned before, I sourced my radicchio from the Natoora range of speciality vegetables and salads stocked by online supermarket Ocado. Others may get their fix from buying expensive shoes or handbags. It’s a new vegetable that does it for me…

Many varieties are named after local towns but this one bucks the trend, tardivo simply meaning “late” in Italian. It’s produced by starting with the more common Radicchio di Treviso (which is a town in Italy) which then undergoes ra complex growing-forcing method of cultivation. This somewhat akin to our own home-grown Yorkshire rhubarb and producing a similarly startlingly-coloured beautiful plant to brighten up late winter meals. Sorry, but the season ended in March so you’ll have to wait until, say, next November to try it. Looks like I’ve been somewhat tardiva myself.

Don’t try and put tardivo into a salad – it’s best cooked either simply as a roast vegetable (see my recipe below) or used as an intriguing ingredient in other recipes.
I was searching around for more radicchio tardivo recipes and came across this one from on Italian recipe site Giallozafferano which in turn comes from the lovely blog La Salsa Aurora.
I’ve rather freely translated it and adapted it for flour we can easily buy in the UK. Be warned I haven’t tried the recipe myself yet so can’t vouch 100% for the quantities and timings. I really like the sound of a dark rolled-up pizza-style affair and think the inclusion of rye flour should work really well with the gutsy flavour of the radicchio.
Recipe for roast radicchio tardivo
This is my own tried and tested way of cooking radicchio more or less the way the Italians do it. It makes a good accompaniment to roast pork or veal. The slight bitterness of the roast leaves is very agreeable with rich-tasting fatty meats. Sadly the glorious magenta of the leaves turns to workaday brown when roasted.
Serves 4
Ingredients
4 good-sized heads of radicchio tardivo
4 tablespoons olive oil
Maldon salt and freshly ground black pepper
Preheat the oven to 180 degrees C (fan). Strip off any bruised outer leaves from the tardivo, rinse it under cold running water and shake/pat it to remove excess water. Cut in half lengthwise and cut out the bottom of the root by making a small V shaped notch in each half but keeping the half piece intact. Lay the halves on a baking tray, overlapping a little if necessary. Drizzle with 2-3 tbsp of the olive oil and sprinkle with salt and pepper. Bake for about 10 minutes, remove from the oven and drizzle with the remaining oil. Bake for 5 minutes’ more. It is done when the root is tender. The leaves will be thoroughly wilted and brown.
Recipe for savoury strudel with radicchio tardivo and mozzarella
Adapted from a recipe found on the Italian blog La Salsa Aurora.
Makes 2 strudels – serves 6 in total
Ingredients
150g rye flour
150g Allinson Seed and Grain bread flour
3/4 teaspoon instant dried yeast
3/4 teaspoon salt
160g water
a little extra virgin olive oil
150g approx of radicchio tardivo
3 mozzarella balls
salt and black pepper
2 tablespoons chopped parsley
Mix together the flours, salt and yeast. Add the water and mix with a wooden spoon. Leave for 10 minutes, covered, then knead in the bowl briefly and rest again for 10 minutes. Repeat twice more then lightly oil the dough, cover and leave to prove for 1 hour.
Whilst the dough is proving, prepare the filling. Drain the mozzarella balls and tear into rough pieces with your fingers. Set aside.
Wash, dry and trim the radicchio and separate it into individual leaves. Set aside.
Preheat the oven to 200 degrees C (fan).
Once the dough has proved, knock it back and divide it into two equal pieces. Roll out the first piece reasonably thinly into a rough rectangle (as if you were making a rectangular pizza) and transfer it onto a baking sheet, stretching it into shape. Scatter over half of the mozzarella and radicchio and drizzle liberally with olive oil. Season with salt and pepper and sprinkle over half the chopped parsley. Roll up and press the dough edges together, moistening the dough to achieve a good seal. Drizzle with more olive oil and scatter a little sea salt over the surface.
Repeat with the second piece of dough.
Bake for approximately 20 minutes.
Cameroon breakfast
March 30, 2013 § 2 Comments
The latest in our Breakfasts of the World Project series.
Until the recent kidnapping of a French family in the far north of the country, football had been the only reason Cameroon hit the international headlines. The national team “Les Lions Indomptables” in their red, green and yellow strip echoing the national flag, has the best World Cup track record of any African nation. Cameroonian player Samuel Eto’o is reputedly football’s highest paid player under his contract with far-flung FC Anzhi Makhachkala (Russian Premier League).
Irregularly-shaped Cameroon is situated on Africa’s West coast between Nigeria to the North and West and Equatorial Guinea and Gabon to the South. The country’s name derives from Rio dos Camarões – river of shrimps – the name Portuguese explorers gave to the region. Cameroon first became a German colony but was divided between France and Britain post First World War. Independence and the merging of the two parts of the country occurred between 1960 and 1961 with Yaoundé as capital city.
Our chosen menu was beignets, also known as Puff-Puffs – a simple deep-fried yeasted doughnut, and also bouilli d’arachides, a peanut-butter enriched version of sweetened maize porridge.
Inspiration for the menu came from Californian aid worker and blogger Mara’s post here and also the clear and eminently readable Cameroonian and African food blog Ma Cocote. Reading through these posts you immediately gain a snapshot of this incredibly varied country. The food names – bouilli and beignets are French words, a legacy of the country’s colonial past. Mara talks about the bouilli being the evening meal breaking the Ramadan daylong fast. Although Christianity is nominally the dominant religion, a significant minority of the population (about 20%) are Muslim. Cameroon extends north to the fringes of the Sahara desert with its Extrême Nord province bordering on Lake Chad. In contrast, the south east of the country is equatorial rain forest territory, home to the Baka people (formerly referred to as pygmies).
Mara gives a sketchy recipe for bouilli so rather than following her instructions to the letter I did my own thing. I used a quick-cook polenta made up according to the packet instructions but with half milk and water instead of water alone. I then added sugar to taste and finally a big dollop of peanut butter plus an extra drizzle of milk.


The resulting mush was pronounced “OK” by the family – a bit bland perhaps but a soothing easy-to-eat breakfast that, with the addition of peanut butter, really packs in the calories.
The Puff Puff doughnuts were a different story altogether. These disappeared in seconds! I give below the recipe I adapted from the Ma Cocote blog. It’s a simple yeast-raised batter made with just milk, water, flour, salt, sugar and instant yeast which, after proving, is dropped into your deep-fat fryer. For authenticity I fried the doughnuts in peanut oil which gives a very good non-greasy and nicely flavoured result (I find sunflower oil has an unpleasant greasy taste). To achieve a perfectly spherical Puff Puff the recommended technique is to get in with your hands and extrude the batter from your partially clenched fist. I wasn’t brave enough to try this in the frying-station I’d set up in our garage but I think the spoon-shaped ones were pretty creditable for a first attempt.


Recipe for Beignets (Puff-Puffs) – Cameroonian doughnuts
Adapted from a recipe in Cameroonian food blog http://www.macocote.com
Makes about 20.
Ingredients
175g strong plain flour
175g ordinary plain flour
5g fast action dried yeast (the type that can be mixed straight into the flour without the need for prior activation)
75 golden caster sugar
1/2 teaspoon salt
300ml milk and water mixed at room temperature (no need to warm)
MIx the dry ingredients together thoroughly in a large mixing bowl.Add the milk and water mixture and stir well to combine into a thick batter. Cover and leave to prove until the batter has become very bubbly and puffed-up. This is likely to take at least an hour, maybe two and will happen more quickly if the bowl is left in a warm place.
Drop tablespoons of the mixture into a deep-fat fryer ideally using peanut oil. Fry at 190 degrees C for about 7 minutes, turning the doughnuts over halfway through the cooking time. They are ready when they are a deep golden brown. Drain on kitchen paper, sprinkle with caster sugar and serve immediately.
More Proper Puddings – Individual Spotted Dicks
March 5, 2013 § Leave a comment
It was back in February 2010 that I last wrote about good old-fashioned English puddings so it’s high time I returned to the subject. Yes I know it’s March now so technically we’re in what the Met Office calls Spring but looking out of the window this morning there’s a sharp frost on the ground so a warming suet pudding would still be very welcome.
I have a weakness for traditional suet puddings which have an undeserved reputation for heaviness. Carefully made, ideally with freshly grated beef suet rather than Atora, they can be beautifully light.
Tracking down an authentic Spotted Dick recipe from my quite extensive collection of recipe books proved surprisingly tricky. After leafing through Mrs Beeton, Jane Grigson, Delia, Prue Leith et al I’d drawn a blank. The only recipe named Spotted Dick I could find was in my trusty battered old copy of The Good Housekeeping Cookery book. This very simple recipe includes just suet, flour, breadcrumbs, currants,milk to bind and a flavouring of grated lemon peel. It’s shaped into a neat roll shape, enclosed in greaseproof paper and foil and steamed for 2 hours.


The traditional roll-shaped pudding worked just fine but I was after something a little daintier and more appealing to a suet pudding first-timer. I tried the same mixture shaped in individual pudding moulds first steamed and another batch water-bath baked for just an hour. This didn’t work half so well and in the case of the baked pudding was really quite unpleasant – stodgy and oily. I concluded that long steaming to allow the ingredients to meld properly was important.
I then sought inspiration from 2 further places – 1) the ingredients list on the pack of Marks and Spencer individual Spotted Dick puddings (yes,really, and rather good too!) and Mrs Beeton. Mrs Beeton may not have a pudding called Spotted Dick but she does list countless different suet puddings many of which contain eggs and more flour than my recipe.
After a little tweaking and experimentation (adding eggs and more milk to give a softer batter-like texture, increasing the flour, soaking the currants in cold tea overnight to make them beautifully moist, adding a little ground allspice to lift the flavour) I came up with my own recipe below which I think is a winner and can hold its own with its Marks and Spencer counterpart both in terms of appearance, flavour and texture:

Don’t forget to serve with plenty of proper custard!
Recipe for Individual Spotted Dicks
Adapted from a recipe in “The Good Housekeeping Cookery Book”. Makes 7
Ingredients
150g plain flour
3 level teaspoons baking powder
150g fresh white breadcrumbs
112g suet
210g currants soaked for several hours or overnight in tea
75g golden caster sugar
level teaspoon ground allspice
grated rind of 1 and 1/2 lemons
2 medium eggs, beaten until lightly frothy
75ml-125ml milk (3-5 tablespoons) to mix to a soft dough consistency
1. Lay out 7 individual pudding basins in one or two large lidded casseroles or saucepans. There’s no need to grease as the suet will do this for you as it melts during steaming. I use Lakeland foil disposable basins available in packs of 50. Preheat an oven to 160 degrees C if you plan to steam in the oven.
2. In a mixing bowl stir together thoroughly the flour and baking powder. Add the crumbs, suet, sugar and lemon rind to the bowl and stir to mix.
3. Add the drained currants, beaten eggs and 75ml (3 tablespoons) milk. Stir until well blended adding a little more milk if necessary until you achieve a soft dough consistency.
4. Divide the mixture between the pudding basins, placing them back in the steaming pan. Cover each one tightly with foil. You can judge whether the basins are equally filled either by eye or more accurately by weighing them on some digital scales. My filled basins weighed 140g each including the 4g weight of the empty foil basin ie the weight of mixture was 136g each.
5. If you’re steaming in the oven, place the pan in the oven then fill with boiling water from the kettle to come half way up the sides of the puddings. If you’re steaming on the hob, again place the pan in position and add boiling water from the kettle.
6. Steam for 2 hours. Turn out (you may need to run a knife round the edge of the basis first) and serve with lashings of proper custard.
Castelfranco radicchio
February 22, 2013 § Leave a comment
Since discovering the Natoora range of unusual vegetables and salads now supplied by Ocado I’ve become obsessed by trying every kind of radicchio on offer. Radicchio originates from the Veneto region of Italy and many of the varieties are named after local towns.
First up is the gorgeous Castelfranco radicchio with its cream and deep-red variegated leaves:

It’s as pretty as an old-fashioned rose and you just have to admire it before adding it to your salad bowl:

The delicately bitter leaves of Castelfranco are best suited to salads which brighten up the winter table. The leaves are not as delicate as they look either in flavour or texture so partner well with robust ingredients such as bacon, citrus fruits and nuts.
Here’s one of my recent slightly over-the-top lunchtime creations:

Here are the recipes for two simpler salad recipes, the first from Italy’s legendary “Il Cucchaio d’Argento” cookbook, and the second inspired by a Skye Gyngell recipe published in 2011 in her Independent column. Finally, another “Il Cucchaio d’Argento” recipe, this time for ricotta and walnut stuffed Castelfranco leaves which are briefly blanched in boiling water before being used to encase the filling.
Recipe for Castelfranco radicchio and pancetta salad
Adapted from a recipe in Il Cucchaio d’Argento. Serves 4.
Ingredients
250g Castelfranco radicchio
200g cubed pancetta
Maldon salt and freshly ground black pepper
A few spritzes of white balsamic vinegar (optional)
Lightly toasted small slices of baguette/ciabatta/country bread to serve
Detach the leaves from the radicchio head and wash and dry them carefully. Arrange them attractively on a large salad plate.
Place the cubed pancetta in a frying pan and heat gently to render the fat. Once the fat is rendered increase the heat and cook until the pancetta is lightly browned.
Pour the pancetta and its rendered fat over the Castelfranco leaves, crumble over a flew flakes of Maldon salt and a few twists of black pepper and quickly toss the salad to distribute the pancetta and its fat evenly. If likes, spritz the leaves lightly with white balsamic vinegar (you can buy it in plastic bottles fitted with an atomiser top).
Serve with lightly toasted small slices of toasted bread alongside.
Recipe for Castelfranco radicchio, orange and hazelnut salad
Adapted from Skye Gyngell’s recipe published in the Independent on Sunday in January 2011. As the author says, it makes a refreshing winter salad, perfect as a light first course.
Serves 4
Ingredients
1 small to medium head Castelfranco radicchio
handful shelled blanched hazelnuts
2 oranges, preferably blood oranges
1 teaspoon Dijon mustard
1 tablespoon red wine vinegar
3-4 tablespoons hazelnut oil
Maldon salt and freshly ground black pepper
Remove the leaves of the radicchio from the head, wash, dry carefully and tear into large pieces. Arrange in a salad bowl or on a serving platter.
Lightly toast the hazelnuts in a dry frying pan being careful not to let the toast too much. Chop roughly and sprinkle over the salad leaves.
Cut the peel and pith off the oranges using a very sharp and/or serrated small knife. Slice the naked oranges into pinwheel shapes and arrange these over the salad.
Finally make the dressing by whisking together in a small bowl the mustard, red wine vinegar, 3 tablespoons hazelnut oil and a little salt and pepper. Taste and add more oil,salt and pepper if required to balance out the flavours. Spoon the dressing over the salad using just as much as required as the salad should not be overdressed.
Recipe for Castelfranco radicchio rolls stuffed with ricotta and walnut
Adapted from a recipe in Il Cucchaio d’Argento. Serves 4.
Ingredients
10 large handsome Castelfranco radicchio leaves
100g ricotta
2 tablepoons freshly grated parmesan cheese
20 walnut halves (I like Serr walnuts from Chile available from Sainsbury’s)
1 egg yolk
salt and pepper
butter for the baking dish
Preheat the oven to 180 degrees C.
Blanch the radicchio leaves a few at a time in a large pan of boiling salted water for 1 minute. Remove and set out to dry carefully on clean teatowels.
Roughly chop the walnuts and put them into a bowl along with the ricotta, a little freshly grated parmesan, salt, pepper and egg yolk. Mix thoroughly.
Put a tenth of the ricotta mixture onto each blanched radicchio leaf and roll to form a neat rolled bundle. Place each stuffed roll into a generously buttered baking dish, arranging neatly side by side.
Bake for 15 minutes and serve straight from the baking dish.
Bergamot preserves
February 8, 2013 § 3 Comments
I drink quite lot of Earl Grey tea and enjoy the instant flavour hit that bergamot can bring to an otherwise indifferent teabag. So when I recently saw bergamots on sale in their natural state for the first time ever I just had to buy a bagful. They’re a spherical greenish-gold citrus fruit the size of a small orange, a speciality of Calabria in Southern Italy. They don’t look anything special but scratch the surface of the skin and the powerful and unmistakeable aroma is released.

Having inspected and admired by bag of bergamots, the question was what on earth to do with them? They look a bit like small oranges and have a sour juice so they are obvious candidates for marmalade. I decided that for starters, I’d make a half-size batch of marmalade, modifying my favourite seville orange recipe to suit these strange and exotic citrus fruits.
I decided that a fine shred marmalade would be most appropriate so as not to overpower the preserve with overly-thick chunks of that highly aromatic peel. This requires carefully peeling the fruit with a sharp potato peeler, in a single spiral if you’re up for the challenge, then cutting the peel into the finest shreds possible with a sharp knife.

The shreds of peel together with a muslin bag containing the peeled half-fruit shells and pips are soaked overnight in the quantity of cold water specified in the recipe to which the squeezed fruit juice is added. This soaking has a dual purpose: it begins to soften the peel and helps dissolve the all-important pectin which is mainly contained in the white pith and pips.

The next day, the peel is boiled, partly covered, for a full 2 hours so that it softens thoroughly. It should be meltingly soft, the texture of overcooked pasta at this stage as, weirdly, once the sugar is added it stiffens up again.
The boiled liquid, once cool enough to handle is measured (or weighed if you prefer) in order to calculate the required quantity of sugar (450g sugar per 500ml liquid). Also at this stage you can decide whether you want to remove some of the precious bergamot shreds to achieve the right balance between clear jelly and pieces of peel. You could always try and crystallise any spare peel for an unusual cake ingredient.
You’re then finally ready to combine the calculated amount of sugar with the citrus liquid in a preserving pan to achieve a set. This shouldn’t take long so it’s essential to have all your preserving bits and pieces laid out and ready (sterilised jam jars and clean lids ready; jam thermometer and funnel to hand; and several saucers chilled in the freezer). It’s also worth tasting the liquid before you begin boiling to check acidity levels. The liquid should taste distinctly sour and if it doesn’t, you can add the juice of a further bergamot (or a lemon if you have bergamots to hand!) to the pan.
I would guess that the bergamots have a high pectin content as I achieved a set quite quickly (less than 15 minutes’ boiling) and rather suddenly. I took the mixture off the boil at about 103 degrees C, ie before the mixture reached my seville orange soft set temperature of 104.5 degrees C. The set I ended up with was quite firm though not the dreaded “rubber set” but ideally I’d have gone for something softer.

The end result was a delicately coloured marmalade with greenish tinge and, though I say so myself, exquisite flavour, not too sweet with plenty of acidity. My only quibble was that in a jar the marmalade looks a tad cloudy, and as I mentioned before, the set was just a little firmer than my personal ideal.
Rereading my notes from last year (should have done this before I started!) I see that one suggestion to avoid cloudiness is to skim regularly during boiling rather than adding a knob of butter to prevent scumming
I reckon the marmalade is still good enough to send off to the 2013 World Marmalade Competition so a jar is winging its way to Dalemain in Cumbria as we speak, entered under the “Any Citrus” category. Fingers crossed…
A fortnight later, the rest of the bergamots had ripened a little and become more golden in colour:

This lot were destined for an experimental batch of bergamot curd. I decided to use a lemon curd recipe, swapping the lemons for bergamots which are approximately the size of large lemons and have similar acidity levels. Recipes for lemon curd are many and various so, for simplicity, I chose one using whole eggs rather than just egg yolks. This gives the curd a tendency to become a little lumpy as the coagulation temperatures of yolk and white are different, but this is not a problem as the finished curd is sieved before potting.
You need to rig up an impromptu double boiler but this is easily achieved by setting a heatproof bowl into a pan of water and then it’s simplicity itself to combine the zest and juice with the eggs, butter and sugar:

The curd will thicken quite quickly but does requires constant stirring with a wooden spoon or balloon whisk as it does so. Once it’s passed through a sieve you’re ready to pot:

The end result is silky smooth, golden and packs a punch in terms of a powerful perfumed bergamot aroma. Personally I think it’s a bit much spread on your morning toast but it’s perfect for puddings, swirled through Greek yoghurt or combined with crème fraîche and fruit for a pavlova or roulade filling.
Recipe for Bergamot Marmalade
Makes approximately 1.1kg marmalade – 3 regular sized jars
Ingredients
850g bergamots
1.3 litres cold water
Approximate 1kg granulated sugar
1. With a potato peeler peel the skin from the bergamots, leaving as much white pith on the fruit as possible. Slice the peel into thin shreds and put into a large pan lidded pan.
2. Line a large bowl with a piece of muslin, leaving plenty to overhang the sides of the bowl. Cut the bergamots in half. With your hands, squeeze the juice from the fruit over the bowl, dropping the leftover squeezed fruit, pith, pips and flesh, into the muslin. Lift the muslin out of the bowl, gather the sides and squeeze any remaining juice into the bowl. Tie the muslin together to keep the fruit in and form a bag.
3. Place the muslin bag in the saucepan with the peel, leaving the top of the muslin overhanging the saucepan. Add the squeezed fruit juice and 1.3 litres cold water to the pan. Heat until boiling, then reduce the heat and simmer for 2 hours, until the peel is tender.
4. Remove the muslin bag and squeeze all the sticky juice from the bag into the pan. An easy way to do this is to put the bag in a colander and use a spoon to press it out. Measure the contents of the pan in a jug (or weigh in the pan using a suitable pair of scales having had the foresight to weigh your pan in advance). Return to the pan and add 450g of sugar for every 500ml liquid. Gently heat until the sugar crystals have dissolved. Increase the heat and boil rapidly for 5 minutes.
5. Test that the marmalade has reached setting point by putting a teaspoon of the liquid on a cold saucer and gently pushing with the back of a spoon. If the liquid starts to wrinkle, setting point has been reached. If no wrinkling happens, keep boiling and retest every 5 minutes. If using a sugar thermometer, setting point is likely to be achieved at about 102 degrees C. Turn off the heat as soon as you reach setting point.
6. Skim any scum from the surface. Leave the mixture to stand for 15 minutes. Stir gently, then carefully spoon into warmed sterilised jars. Put screw top lids on while the marmalade is still hot and turn upside down for 5 seconds to sterilise the lids.
Recipe for Bergamot Curd
Makes about 600g curd enough to fill 3 or 4 small jars.
Ingredients
4 bergamots
4 whole eggs, lightly beaten
150g unsalted butter, cut into cubes
350g golden caster sugar
Before you begin, you need to set up an impromptu double boiler. I did this by setting a medium sized metal mixing bowl over a large saucepan of cold water. It’s OK in fact desirable that the bowl sits in rather than over the water as it would if you were aiming to melt chocolate.
Grate the zest and squeeze the juice from the bergamots and put into the bowl part of your double-boiler set-up. A microplane grater makes grating the zest a doddle. Add the eggs, butter and sugar to the bowl, set it over the pan and turn on the heat. Stir with a wooden spoon regularly as it slowly warms through.
Once the water is boiling, keep stirring as the eggs coagulate and the curd thickens.
As I’m a curd-making novice, I checked the temperature of my curd once it looked sufficiently thickened and removed the bowl from the heat once it reached a temperature of 80 degrees C. This worked well as the finished product has a soft spreading consistency and for my taste is neither too runny nor too thick.
Don’t worry if your curd is not perfectly smooth as the next step is to push it through a sieve into another very clean and dry medium bowl. This removes the grated zest and any stray eggy lumps that may have formed.
Once the curd has been sieved, carefully spoon it into small jam jars sterilised in your preferred way. As the flavour of this curd is so intense, small jars are best. I like to warm them in the oven set to its lowest temperature of around 120 degrees C. Cover and once cool, the curd is best stored in the fridge.
Cambodian breakfast
February 4, 2013 § 4 Comments
The latest in our Breakfasts of the World Project series.
New Year, new letter of the alphabet – we’re finally onto the letter C! – new country.
In preparation for our Cambodian breakfast I watched Roland Joffé’s “Killing Fields” on DVD documenting the friendship between New York Times reporter Sydney Schanberg and his Cambodian colleague Dith Pran. The Vietnam war spills over the border into neighbouring Cambodia and the Communist Khmer Rouge take control of Cambodia’s capital city Phnom Penh in 1975. Schanberg gets away unscathed but Pran, as an urban intellectual, is taken prisoner by the Khmer Rouge and made to work in harsh labour camps and witnesses Pol Pot’s in the killing fields.
How things have changed in the last 30 odd years. Cambodia is now very much on the modern-day Grand Tour with the holy city of Siem Reap and the temples of Angkor Wat a must-see destination. And a tourist website gives the following cursory directions to another top tourist attraction:
“The Killing Fields of Choeung Ek are 15 km from Central Phnom Penh. To get there, take Monireth Blvd south-westward out of the city from the Dang Kor Market bus depot.”
So what to eat for our Cambodian breakfast? The opening scenes of “The Killing Fields” feature Schanberg and colleague Al Rockoff (memorably played by John Malkovich) ordering café complet and aspirin at Phnom Penh’s Café Central but I was after something altogether more authentic. Fortunately, travel blogs are almost unanimous in identifying Nom Banh Chok – bowls of rice noodles with fish curry ladled over – as the ubiquitous breakfast dish in Cambodia.
You can read about the extremely laborious process of making Nom Banh Chok rice noodles by hand here, a link to the fascinating and beautifully photographed Eating Asia blog.
The list of ingredients required to make Num/Nom Banh Chok (spellings transliterated from the Cambodian language are many and various). I succeeded in tracking down an authentic recipe which comes from another West/Eastern duo – not Schanberg and Pran this time but Austrian and Cambodian chefs Gustav Auer and Sok Chhong who co-authored the cookbook “From spiders to water lilies” containing recipes from their Phnom Penh restaurant Romdeng (Cambodian for the key flavouring ingredient galangal).
Having tracked down an authentic recipe I wanted to do my best to use authentic ingredients. Whereas most large supermarkets now stock lemongrass, Thai basil, Kaffir lime leaves, Thai fish sauce and coconut cream and milk (and you can get hold of Kaffir limes from the Natoora range carried by online supermarket delivery service Ocado), some of the ingredients listed necessitated a special expedition to Manchester’s Chinatown.
I was delighted to be able to track down galangal, fresh turmeric and something close to the recipe’s specified “Cambodian rhizome” at Kim’s Thai Food Store. What I bought was Boesenbergia Pandurata aka Kaempferia pandurata, Chinese Keys, lesser galangal (though this name is probably incorrect), krachai (Thai), kcheay (Khmer) and kunci (Indonesian).


The aromatics were chopped then blitzed in the food processor to produce 15 tablespoons of precious yellow curry paste:

To complete the curry, a whole new batch of ingredients were needed. Coconut cream, fish sauce and coconut milk are now readily available in supermarkets. I had no idea at the time what type of fish to use, or even if it should be sea or freshwater fish so I chose a fresh and healthy looking Anglesey farmed seabass from my local fishmonger who expertly converted it into fillets. It was a shame to carefully poach and skin it and then pulp it into oblivion as the recipe specifies!
I’ve since read about Cambodia’s enormous inland Tonlé Sap lake which apparently supplies 70% of the protein consumed in Cambodia, including not only fish but shrimps, crabs, snails, frogs and snakes.
The only ingredient I couldn’t get hold of was the Cambodian fish paste called prahok. According to the helpful Cambodian food leaflet “Cambodia on A Plate”, prahok is “a grey paste of preserved fish…(that is) probably the most distinctive flavour in all Cambodian cooking”. I had to make do with a Thai shrimp paste instead (on reflection the UK anchovy paste we call “Gentlemen’s Relish” might have made a good substitute too).


Curry complete, all that was left to do was prepare the all-important rice noodles, accompanying salad and Thai basil and red chilli garnish. Yet another long list of ingredients, some, such as the cucumber and beansprouts easy to obtain, others, such as banana flower (?) and water lily root (??) a little trickier. I was delighted to find a fresh banana flower in Chinatown but the water lily root request defeated both the Chinese and Thai shop assistants. In the end I went for the helpful suggestion of a lotus root which is apparently used raw in salads in some Thai recipes.


The resulting plate of salad was a thing of beauty:

And finally, after about 6 hours spread over 2 days of shopping, chopping, pounding and boiling, we sat down to breakfast:

Contact details
For Oriental vegetables in Manchester:
Hang Won Hong
Connaught Buildings
58-60 George Street
Manchester M1 4HF
Telephone 0161 228 6182
For Thai (and Cambodian) specialities in Manchester:
46 George Street
Manchester M1 4HF
Telephone 0161 228 6263
For the UK’s only Cambodian restaurant
Lemongrass
243 Royal College Street
London NW1 9LT
Telephone 0207 284 1116
http://www.cambodianlemongrass.co.uk/
Recipe for Num Banh Chok – yellow fish and coconut curry with rice noodles and raw Cambodian vegetables
This recipe is adapted from one in the book “From Spiders to Water Lilies” by Gustav Auer and Sok Chhong published as a fundraising project by the Friends International organisation.
Serves 4-6
Ingredients
For the lemongrass paste
200 g young lemongrass stalks (about 15-16 stalks) trimmed and sliced
2cm cube of peeled and roughly chopped galangal
3cm cube peeled and chopped fresh turmeric
4 kaffir lime leaves, thinly sliced
4 garlic cloves, halved
Peel of half a kaffir lime, chopped
2cm cube peeled and chopped Cambodian rhizome
For the curry
300 g fish fillets, poached
3 tablespoons lemongrass paste
2 tablespoons roasted chopped peanuts
500 ml fish stock
250 ml coconut milk
250 ml coconut cream
1 teaspoon prahok (Cambodian fermented fish paste)
2 tablespoons fish sauce
salt to taste
1 tablespoon palm sugar
To accompany the curry
400 g dried weight thin rice noodles, cooked al dente
2 small cucumbers, cut into matchsticks
half a banana flower, soaked in cold water acidulated with kaffir lime juice then thinly sliced just before serving
200 g bean sprouts
2 pieces of water lily root, peeled and thinly sliced
To garnish
red chillies
few Thai basil leaves
First, prepare the lemongrass paste. Using a food processor, blitz the chopped lemongrass into a paste. Add the remaining ingredients and 4-6 tablespoons cold water and blitz again until well combined. According to the original recipe, this paste will keep refrigerated for one day only, so take what you need for the recipe and freeze the rest in individual containers. This quantity of ingredients produced 12 tablespoons of neon-yellow paste which I froze in 3 tablespoon portions.
Next, poach the fish in the stock until just cooked – for thin fish fillets this will take just 2 or 3 minutes. Leave to cool a little then drain off and reserve the stock to add to the curry and skin the fish fillets making sure no small bones remain in the flesh as you do so. Set aside.
Prepare the raw vegetable accompaniments and garnish, leaving the banana flower pieces in iced acidulated water until the last minute as they discolour very quickly.
Weigh, measure and set out all the curry ingredients and necessary kitchen equipment so you can complete the curry quickly without overcooking the rice noodles and fish.
About 20 minutes before you plan to serve the curry, take the banana flower from the iced acidulated water, dry it and shred finely. Add to your serving platter of accompanying raw vegetables.
Next, soak the dried rice noodles in hot water for about 15 minutes until they soften to just al dente. Keep an eye on them as overcooked rice noodles have an unpleasant mushy texture.
You are now ready to complete the curry. Place the cooled cooked and de-skinned fish fillets with the 3 tablespoons lemongrass paste and peanuts into the bowl of a food processor. Blitz to a coarse paste. Set aside. Put 500ml fish stock, the coconut milk, coconut cream and prahok into a medium saucepan and bring to the boil, stirring frequently to mix. Add the reserved fish paste, fish sauce, salt and palm sugar, and simmer for 5 more minutes, mixing to incorporate.
To serve, put a large handful of vegetables into each person’s bowl. Add a portion of cooked rice noodles then ladle the fish curry over the top. Garnish with finely sliced deseeded red chillies and a scattering of Thai basil leaves.
German new year
January 6, 2013 § Leave a comment
Twelfth night is behind us, the decorations are down and I’m almost into the second week of the now traditional alcohol-free January. Time to take stock of the new year festivities which this year took the form of a German-themed 3 day event hosted by our friends Mike and Janet. We ate our fill of homemade bratwurst (and that was just for childrens’ tea!), Mike’s excellent seeded and rye breads and lots of good wine.


Here’s the menu for the main event on New Year’s Eve:
Silvestermenu und weinkarte 2012
Wurst and leberkäse canapés
2006 Joh. Jos. Prüm Zeltinger Sonnenuhr Riesling Auslese
NV René Muré Crémant d’Alsace Brut Prestige
~
Bräustüberl Weihenstephaner Obatzda mit Bretzeln
Soft pretzels with the original cheesy dip (Bräustüberl Weihenstephan)
1999 Joh. Jos. Prüm Wehlener Sonnenuhr Riesling Kabinett
~
Gugelhofer Riesling pochierte Forelle mit Thymian
Riesling-poached trout with thyme (Gugelhof, Berlin)
1999 Albert Boxler Riesling Brand
~
Rheinischer Sauerbraten mit Spätzle von Wolfgang Puck und Kümmel Krautsalat
Traditional beef sour-roast with spätzle and caraway cabbage salad
2009 August Kesseler Spätburgunder Cuvée Max
~
Birnenküchen
Roasted pears in a yeasted cinnamon-hazelnut cake
1996 Reichsgraf von Kesselstatt Scharzhofberger Riesling Beerenauslese
1976 Hugel et Fils Riesling Sélection de Grains Nobles
~
Käse von Deutschland,England und die Republik Irland
Tilsiter, Colston Bassett, Coolea, Westcombe, Kirkham’s, Cornish Yarg, Tunworth
1983 Grahams Porto Vintage
1977 Warre Porto Vintage
~~~
Janet blithely announced on the morning of the 31st that our work preparing this feast would be “relatively light”. As if! It took us most of the day to get everything ready, and once we were done, Janet and Shelley set up the mincer, stretched the skins and produced several pounds of home made bratwurst. I watched in amazement as Shelley and Janet coaxed the pork and veal filling into seemingly endless pink links. My contribution to the project was a bit of washing up.
Back to the main event. My task was preparing the obatzda cheese spread and home made pretzels to serve alongside. I’d made pretzels before using an authentic Greg Patent “Baker’s Odyssey” recipe which I did again, this time dipping the pretzels in a bicarb solution rather than full-on caustic soda. I didn’t want to take the risk of chemical burns to self and children and damage to someone else’s home that working with caustic soda solution entails. After the effort of making the pretzels, whizzing up the obatzda was relatively simple. It was served deumurely from a small earthenware pot rather than in great scoopfuls on a big rustic wooden board as is traditional in Munich.


Next course was the trout, poached in a delicate riesling wine along with leeks and carrots for flavour and colour.

The main course was a long-marinated and 5 hour simmered majestic beef Sauerbraten served with authentic spätzle noodles and a crunchy cabbage and caraway salad alongside, a good contrast to the meltingly soft been and noodles. Janet took charge of the spätzle, laboriously pushing the batter through a colander into boiling salted water in true Hausfrau style. The technique of cooling the cooked spätzle in iced water then briefly sautéing in hot oil and butter when ready to serve makes them practical for a dinner party.


Pudding was a magnificent yeasted pear and hazelnut cake which Shelley made. We managed to dovetail our use of the Kenwood mixer and oven very amicably. This was a truly magnificent cake, perfect served warm in delicate slices with billowy whipped cream. If there’d been any left, I’d imagine it would have been rather good served with coffee next morning!

The meal concluded with cheese and port, then a rousing team demonstration of “Gangnam Style” to bring in the New Year and embarrass the children. Start as you mean to go on.
Recipe for Obatzda – Bavarian cheese spread
Traditionally served with soft pretzels as snack. Adapted from a recipe from the Bräustüberl Weihenstephan in Munich. Serves 6 as a starter or snack.
Ingredients
300g piece of Brie cheese, skin and all
23 g softened unsalted butter
50 g cream cheese
1/2 teaspoon ground paprika
pinch of ground caraway seeds
2 tablespoons German beer (Weihenstephaner Vitus Weizenbock or Weihenstephaner Weißbier for authenticity)
salt and freshly ground black pepper to taste
40 g finely chopped red onion (or less depending on your preference).
Process the Brie to a mass in a food processor. Add the butter, cream cheese, seasonings and beer and process again to combine. Remember that the cheeses are already quite salty so go easy on adding salt at this stage.
Finally add the chopped red onion and process very gently once more just to combine.
Refrigerate for a couple of hours to allow the flavours to combine and mellow. You can serve the spread packed into a pretty earthenware pot as we did, or more traditionally, serve in scoops or quenelles on a rustic wooden board alongside the soft pretzels and garnish with red onion rings, chives, and lettuce – a Bavarian ploughman’s lunch I suppose.
Recipe for Spätzle – Germanic rustic noodles
Austrian born celebrity chef Wolfgang Puck’s recipe from Epicurious.com. Serves 8 as a side dish.
Ingredients
4 large egg yolks
1 large egg
1 3/4 cups whole milk
1 pound (about 3 cups) all-purpose flour
1/4 teaspoon freshly grated nutmeg
1 teaspoon salt
1/4 teaspoon freshly ground black pepper
1/2 cup peanut oil
1/2 cup (1/4 stick) unsalted butter, melted
1 tablespoon fresh parsley, minced
In a small bowl, beat together egg yolks, egg, and milk.In medium bowl, whisk together flour, nutmeg, salt, and pepper. Add egg mixture to flour mixture and mix with wooden spoon just until well blended. Do not overmix. Refrigerate, covered for at least 1 hour.
Bring a large pan of salted water to boil. Fill a large bowl with iced water. Place a large-holed metal colander on top of the pan. push one-third of the batter through the holes into the water using a flexible spatula. We think that a food mill set on the large hole screen might do this job pretty well but haven’t tried it out yet. Cook for a minute or two then transfer quickly with a slotted spoon to the bowl of iced water. Make 2 more batches in the same way.
When the spätzle are cool to touch, drain well and toss with 1/4 cup oil. (They can be prepared up to this point and refrigerated, covered, up to 2 days.)
When you are ready to serve, place a large sauté pan over high heat and in it heat the remaining 1/4 cup oil. Add the spätzle and cook, without moving the pan, until undersides are brown, about 2 minutes. Add butter and sauté until golden brown, about 2 minutes more. Season to taste with salt and pepper. Sprinkle with parsley and serve.
Recipe for Birnenküchen – German pear cake
Serves 8 generous portions for teatime or 12 dainty portions for dessert with whipped cream. Adapted from a recipe on Epicurious.com.
Ingredients
For the enriched yeast dough
3/4 teaspoon fast acting instant dried yeast (2-3g – the type that can be added directly to flour)
1 1/2 cups strong plain flour, plus additional for dusting
1/2 teaspoon salt
1/3 cup milk
1/3 cup golden caster sugar
1 whole large egg
1 large egg yolk
1/2 teaspoon vanilla extract
7 tablespoons unsalted butter, cut into pieces and softened
For the pear topping
3 ripe but still firm Conference pears (about 1 1/2 lb total)
2 tablespoons unsalted butter, melted
1/4 cup packed dark brown sugar
2 tablespoons plain fine dry bread crumbs
3 tablespoons hazelnuts, toasted and chopped
1/2 teaspoon cinnamon
Begin by making the enriched yeast dough. Ideally you need a stand mixer (Kenwood or Kitchenaid ) to attempt this recipe.
In the bowl of a stand mixer fitted with a dough hook, stir together the flours, fast action dried yeast and salt. Pour in the milk, turn the mixer on to a low speed and mix for one to two minutes until the flour is moistened and you have a fairly dry shaggy mixture.
Scrape down the sides of the bowl using a plastic dough scraper or rubber spatula. Turn the mixer back on to a low speed and add the egg mixture little by little, then the sugar. Increase the speed to medium and beat for about 3 minutes by which time the dough should have formed into a ball.
Reduce the mixer speed to low and add the butter in 2 tablespoon sized chunks, beating until almost incorporated before adding the next. You will end up with a very soft cake-batter-like dough. Increase the mixer speed to medium and beat until the mixture comes away from the sides of the bowl, about 10 minutes.
Cover the bowl with cling film or a plate and let the dough prove until doubled in size, at least 1 and 1/2 hours, maybe longer.
While the dough proves, prepare the roast pear topping. Preheat oven to 180°C fan.
Peel pears, cut lengthwise into eighths, and cut out the cores. Toss pears with melted butter and 2 tablespoons brown sugar in a 13- by 9-inch glass or ceramic baking dish and arrange in 1 layer.
Roast pears, gently turning and stirring occasionally, until just tender and lightly caramelized, about 45 minutes. Transfer pears to a plate with a slotted spatula. Stir bread crumbs into baking dish, scraping up all brown bits and butter, then transfer to a bowl. Stir the hazelnuts, cinnamon, and remaining 2 tablespoons brown sugar into bread crumbs.
Line a deep 24cm round cake tin, ideally spring form, with a baking paper.
Now you are ready to assemble and bake the küchen. Reduce the oven temperature to 160°C fan.
Knock back the proved dough and transfer it to the lined cake tin and and spread it evenly across the base of the tin with a rubber spatula.
Sprinkle half of the crumb mixture over the dough, leaving a 1-inch border. Gently toss the roasted pears with the remaining crumb mixture and scatter the pears over the dough. Let the küchen rise, covered with plastic wrap for about 30 minutes.
Bake the küchen for about 40 minutes until firm to the touch and deep golden brown. Cool the küchen in its tin on a rack for about 20 minutes, then carefully remove from the tin. Serve warm or at room temperature with softly whipped cream.
Burundi breakfast
December 30, 2012 § Leave a comment
The latest in our Breakfasts of the World Project series.
It’s not long since we breakfasted Burkina Faso style. That was an impoverished landlocked West African country whereas Burundi is an impoverished landlocked East African one. Over to the BBC weather website for some basic facts about the country:
“This small country in central Africa is about the size of Wales or Israel and is densely populated. It lies between 2° and 4°S and is bordered by Rwanda to the north, Tanzania to the east, Lake Tanganyika to the southwest, and the Democratic Republic of Congo to the west. It is a hilly and mountainous country, with its highest point rising to over 4,600 m/15,000 ft.”
I was taken aback by the existence of a 4,600m peak in central Africa that I’d never heard of before – sadly this seems to be a factual error – shame on you BBC!- as other more reliable sources show that the highest peak in Burundi is the whimsically named Mount Heha clocking in at just 2,670m.
Over to another BBC site – a world news one this time – for more facts. This was a depressing roll call of colonial oppression (first the Germans then the Belgians who are presumably responsible for Burundi’s official language being French), Hutu and Tutse civil war, genocide, mass refugee emigration and a shattered economy. Amidst the depressing fatcs I did find this striking image (courtesy of Getty Images) there of a Burundi man on a bicycyle transporting a LOT of green bananas:

Information on Burundian food is hard to come by but the meagre information sources available seem to agree that green bananas or plantains and beans are part of the staple diet. So over to the Celtnet website for a basic red kidney bean and plantain stew which is there described as a main course accompaniment.

I’ve adapted the Celtnet recipe to make it simpler to concoct in my Western kitchen and I give my recipe below. Served with toast and a poached egg plus a cafetière of aromatic East African coffee (coffee is one of Burundi’s principal exports) this made a pretty decent breakfast, the kind of breakfast to set you up for facing the legendary man-eating crocodile Gustave said to inhabit the waters of Lake Tanganyika just off Burundi’s capital city, Bujumbura.

And we’ve reached the end of countries beginning with the letter B just in time to end the year!
Recipe for Burundian bean and plantain stew
Adapted from a Celtnet.org recipe.
Serves 4
Ingredients
14oz can red kidney beans
2 plantains
1 small onion
1 tablespoon vegetable oil
pinch dried chilli flakes
salt and pepper to taste
300ml water
First prepare the vegetables. Drain and rinse the kidney beans in a colander. Peel and slice the plantain into chunks about 1cm thick. Peel and thinly slice the onion.
In a medium lidded saucepan heat the vegetable oil over a medium heat and add the sliced onions. Fry for 5 or so minutes until soft and translucent. Add the plantain slices and fry for 10 minutes more, turning the chunks occasionally so that they don’t burn. Once the plantain has coloured a little, add the drained kidney beans, seasonings and 300ml water. Bring to the the boil, turn the heat down to a simmer, partially cover with the pan lid and cook for about 20 minutes. The stew is ready when the plantain is soft and the liquid has reduced by a half.
